
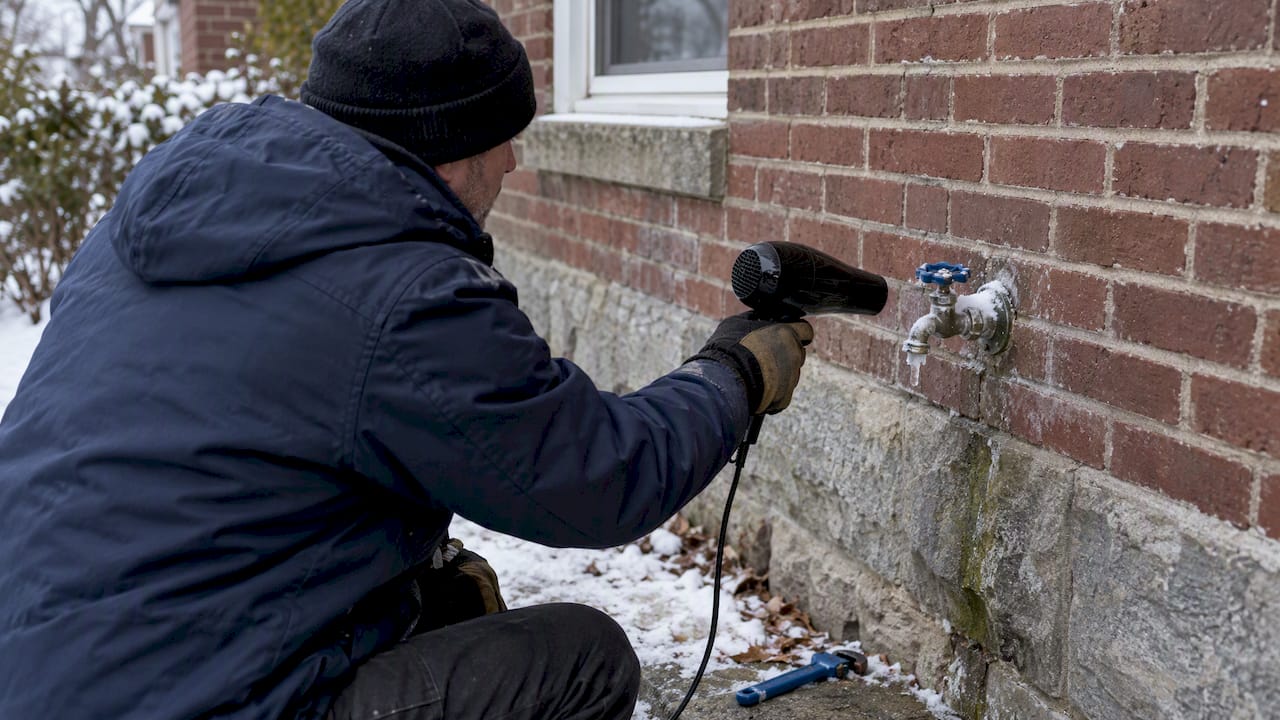
Open the faucet right away and leave it slightly open to relieve pressure, then apply gentle heat at the spout with a hair dryer or warm towel. Never use a blowtorch or other open flame, and avoid boiling water, since both can crack pipes or start a fire. If you see water inside a wall or suspect a break, shut off the main and call a licensed plumber.
TL;DR:
- Disconnect hoses before freeze conditions and drain outdoor faucets to prevent trapped water that can cause lines or fixtures to crack.
- Thaw frozen outdoor faucets gradually from the spout inward using a hair dryer or warm towels, avoiding open flames or boiling water that can damage pipes.
- Confirm interior shutoff valves fully close and ensure exterior lines drain properly to reduce the risk of repeated freezing or internal pipe damage.
- Regularly inspect and replace worn fixtures, ensure proper insulation, and consider using frost-proof sillcocks or heat tape for better freeze resistance.
- Having a licensed plumber assess recurring freeze problems or damage extending into walls can prevent costly repairs and ensure long-term outdoor plumbing safety.
Table of Contents
- 10-minute checklist: what to do first to limit damage
- Step-by-step safe thawing methods for frozen outdoor faucets
- Seasonal winterizing and ongoing prevention for outdoor faucets
- How to check for freeze damage and decide when to call a plumber
- Short myth-busting: what homeowners often get wrong
- Our practical checks and recommendations
- Materials and designs of outdoor faucets that reduce freezing risk
- Long-term repair and replacement options for damaged outdoor faucets
- Seasonal maintenance checklist beyond just winterizing
- Author’s short first-person perspective on common mistakes and one simple, high-impact fix
- How we can help: services and next steps
- FAQ
- Sources
10-minute checklist: what to do first to limit damage
A frozen outdoor faucet gets worse the longer it sits under pressure, so the first ten minutes matter. Work through these steps in order before you start any thawing.
- Turn the outdoor faucet to the “on” position and leave it open so melting ice has somewhere to go.
- Find the interior shutoff valve for that faucet and close it if you notice cracking, bulging, or spraying.
- Disconnect any garden hose and drain it completely, then store it away from the spigot.
- Gather safe heat tools such as a hair dryer or an electric heating pad, and clear away anything flammable nearby.
- If you spot ice forming inside a wall cavity or notice water pooling on the floor or ceiling, stop and call a licensed plumber immediately.
Pro Tip: Keep a towel and a small bucket near the faucet while you work. Melting ice and residual water tend to drip more than you expect.
Step-by-step safe thawing methods for frozen outdoor faucets
Thaw a frozen faucet from the outside in, starting at the spout and working back toward the house. According to MU Extension, warming a pipe too quickly or from the wrong end causes thermal shock that can dislodge soldered joints and create new leaks.
- Confirm the faucet is open so water and air can escape as ice melts.
- Point a hair dryer at the faucet body and the first foot of exposed pipe, moving it back and forth instead of holding it in one spot.
- Wrap the section in warm, damp towels or an electric heating pad as an alternative, refreshing the heat source every few minutes.
- Work gradually toward the wall, never skipping ahead to a spot closer to the house before the section nearer the spout has cleared.
- Watch for water flow to resume and check for drips or spray along the pipe as it thaws.
Never use a propane torch, charcoal, or any open flame, and avoid unvented space heaters indoors near the work area. The Consumer Product Safety Commission warns that these devices carry real fire and carbon monoxide risks in enclosed spaces. The American Red Cross notes that a crack as small as 1/8 inch can release up to 250 gallons of water a day, which is why a few inches of exposed pipe left unmonitored can turn into a real repair bill. If pressure stays weak or you see a steady leak once water returns, shut off the supply and treat it as a job for a professional.
Seasonal winterizing and ongoing prevention for outdoor faucets
Preventing a frozen faucet takes less effort than thawing one, and it starts with getting water out of the line before temperatures drop; for detailed seasonal prep advice, see how to winterize your doors. The core workflow: close the interior shutoff valve that feeds the outdoor bib, then open the exterior spigot and leave it open so any remaining water drains out and has room to expand if it freezes anyway.
Disconnecting hoses matters more than most homeowners realize. USU Extension points to hoses left attached as the most common reason frost-proof sillcocks fail, since a connected hose traps water in the line and defeats the design. A few more habits that pay off over a full winter:
- Fit foam faucet covers or insulated sleeves over exposed spigots before the first hard freeze.
- Wrap exposed pipe runs in unheated basements, crawl spaces, or garages with foam pipe insulation.
- Consider UL-listed heat tape on pipe sections that have frozen before or that run through consistently cold spaces.
- Drain and winterize any sprinkler system lines that share a supply with your outdoor faucets.
- Open cabinet doors under sinks on exterior walls during a cold snap so household heat reaches the pipes.
Pro Tip: A foam cover costs a few dollars and takes two minutes to install, which makes it one of the cheapest repairs you’ll never have to make. For deeper guidance on sealing up exterior lines, see our cold climate outdoor plumbing tips and our notes on insulating water pipes. A DIY cover handles most faucets, but a pro visit makes sense for lines buried in hard-to-reach spots or faucets that freeze every single year.
How to check for freeze damage and decide when to call a plumber
Thawing a faucet doesn’t always mean the problem is solved. Ice can crack a pipe quietly, and the leak only shows up once water pressure returns. Run through these checks once flow resumes:
- Open a few other faucets in the house and see if pressure feels normal everywhere, not just at the thawed spigot.
- Look at walls and ceilings near the exterior faucet for new stains, bubbling paint, or soft spots.
- Listen for the sound of running water when every fixture in the house is off.
- Check for new puddles near the foundation, in the basement, or under sinks on exterior walls.
If you find a steady drip, a damp wall, or hear water moving with nothing turned on, shut off the main water supply and call a licensed plumber rather than waiting to see if it gets better. A pipe crack as small as 1/8 inch can push out a significant amount of water in a single day, and that volume adds up fast behind drywall. Our guide on diagnosing a leaking outdoor faucet walks through the warning signs in more detail if you want to confirm what you’re seeing before calling for help.
Short myth-busting: what homeowners often get wrong
A few persistent myths lead homeowners to skip prevention steps that actually matter.
- “Frost-proof faucets can’t freeze.” They resist freezing only when the line drains properly, and a hose left connected traps water that defeats the design, according to USU Extension.
- “Insulation guarantees protection.” Foam covers and pipe sleeves slow heat loss, but the Red Cross notes insulation alone isn’t a fail-safe during an extended subzero stretch, so pair it with draining and disconnecting hoses.
- “A dripping faucet always fixes the problem.” A slow drip can keep water moving and reduce freeze risk, but it wastes water and isn’t a permanent fix for a chronically cold line.
Our practical checks and recommendations
After many winter service calls, a few patterns keep showing up. The faucets that freeze most often are the ones where a hose stayed connected through the first cold snap, or where the interior shutoff was never installed in the first place. Confirming that shutoff exists, and that it actually closes, is the single check we recommend before every winter.
On materials, brass fittings tend to hold up better than plastic under repeated freeze-thaw cycles, and a frost-proof sillcock is worth installing if your current faucet sits flush with an exterior wall. A service call is recommended for recurring freezes in the same spot, any section that freezes inside a wall cavity where you can’t reach it safely, or a leak that shows up once thawed water starts flowing again.
Pro Tip: If the same faucet freezes two winters in a row, the fix is almost never more insulation. It usually means the line needs to be rerouted or replaced.
Materials and designs of outdoor faucets that reduce freezing risk
Standard hose bibs sit close to the exterior wall with little protection from the pipe behind them, which is why they freeze so easily. A frost-proof sillcock solves part of that problem by extending the valve stem well into the heated interior of the house, so the part that actually holds water sits inside the warm zone rather than at the wall surface. The exterior spout only carries water when the valve opens, and it drains automatically once you shut it off, provided no hose is blocking that drainage.
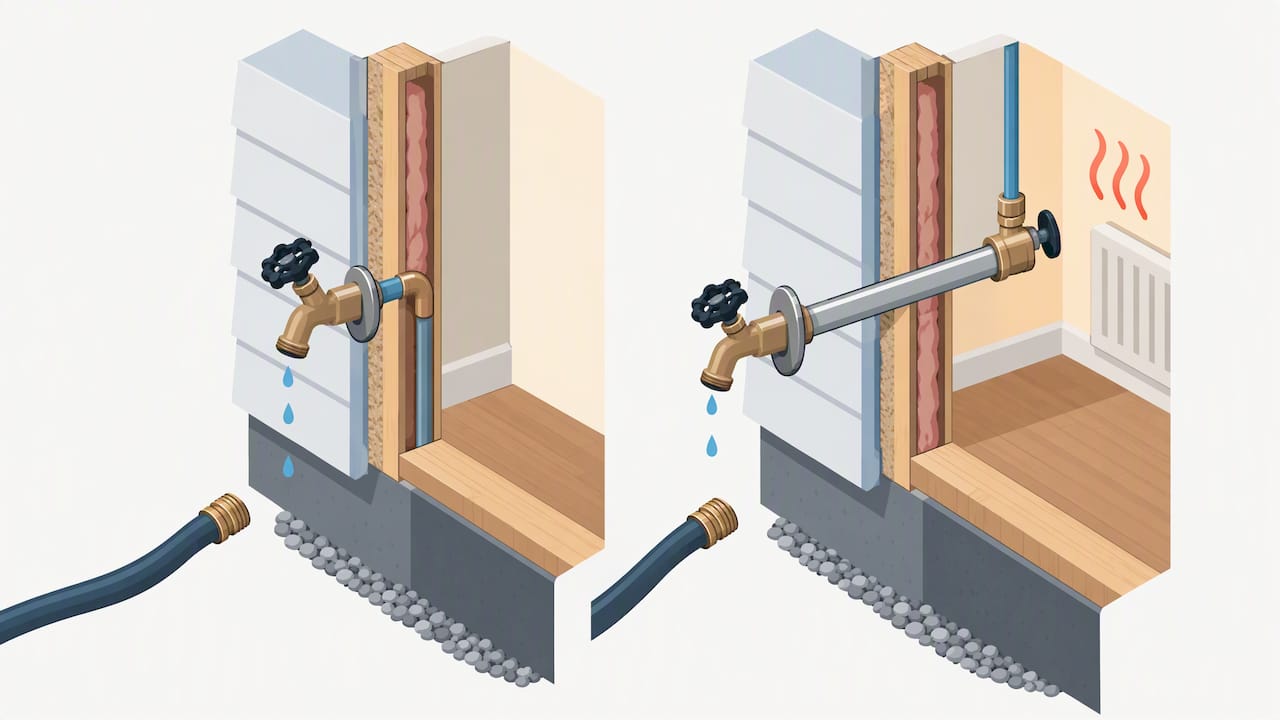
Brass and bronze fittings resist the stress of repeated freeze-thaw cycles better than plastic components, which can become brittle and crack over several winters. Vacuum breakers, found on most modern outdoor faucets, add a layer of backflow protection but don’t affect freeze resistance on their own.
For homes in consistently cold regions, a faucet with a longer stem, sometimes called a wall hydrant, pushes the shutoff point even further inside the structure. Pairing any of these designs with a foam cover and proper hose disconnection gives you the best combination available for an exterior fixture, since even a frost-proof model depends on the line actually draining after each use.
Long-term repair and replacement options for damaged outdoor faucets
A faucet that cracked once during a freeze doesn’t always need full replacement, but it’s worth having someone assess the damage rather than just patching the symptom. A simple washer or packing replacement can fix a leak at the handle, while a cracked valve body or stem usually calls for swapping the whole fixture.
If the same standard hose bib keeps freezing winter after winter, replacing it with a frost-proof sillcock is often the more permanent fix, since it moves the vulnerable part of the line inside the heated structure. This is a reasonable project for a plumbing repair visit, particularly if the old fixture is original to an older home and the surrounding pipe shows signs of corrosion.
When freeze damage extends past the faucet itself, into a section of supply line inside a wall or crawl space, repiping that section becomes the safer long-term option rather than repeated patch repairs. Catching and replacing damaged sections early tends to cost far less than dealing with a full burst pipe later in the season.
Seasonal maintenance checklist beyond just winterizing
Winterizing handles the cold months, but a few habits spread across the rest of the year keep outdoor plumbing in better shape overall. In early spring, check every outdoor faucet for cracks or leaks that may have developed over winter before you reconnect hoses for the season.
Through summer, inspect hose connections and washers periodically, since a worn washer at the spigot can let water sit in the threads and contribute to freeze damage the following winter. Fall is the time to disconnect and drain hoses, test the interior shutoff valve to confirm it still closes fully, and look at foam covers or pipe insulation for wear before the first freeze arrives.
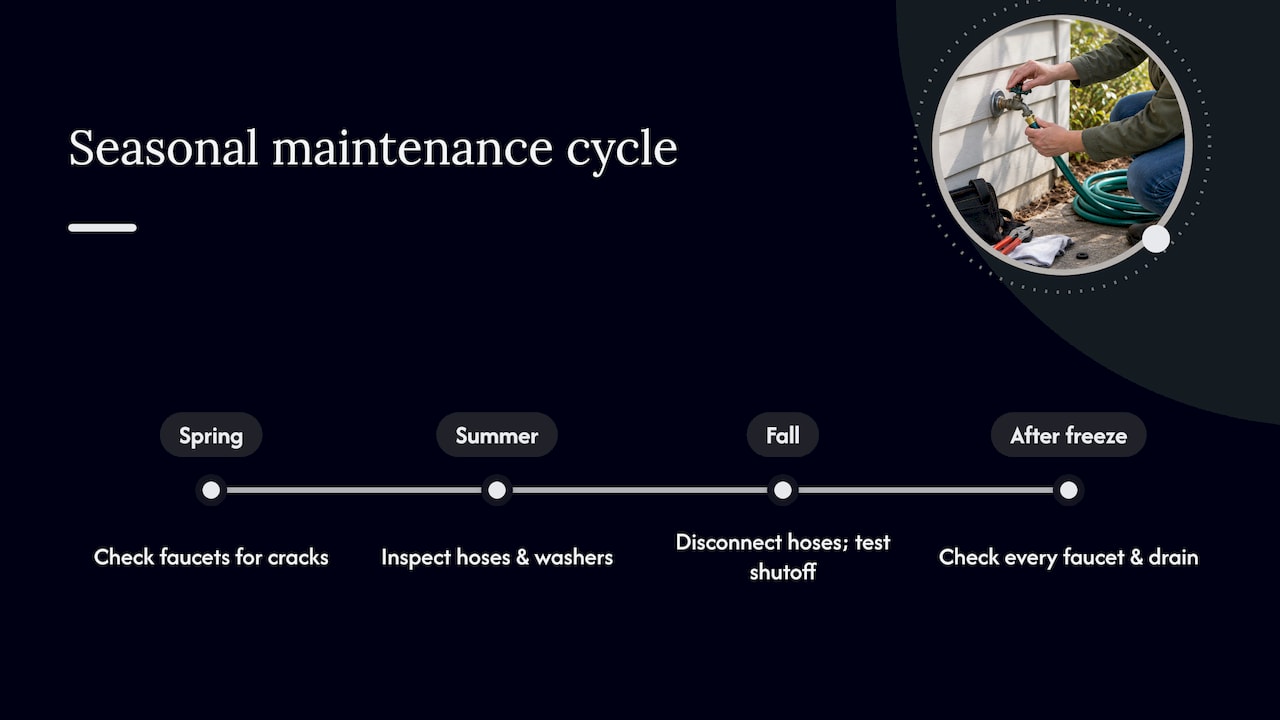
MU Extension points out that when one pipe freezes, others in the same exposure area often freeze too, so a quick check of every faucet and drain after any freeze event is worth the few minutes it takes. Building these checks into a seasonal routine, rather than treating cold weather prep as a one-time task, catches small problems before they turn into repairs.
Author’s short first-person perspective on common mistakes and one simple, high-impact fix
The mistake I see most often isn’t bad insulation, it’s a garden hose left connected through the first freeze of the season. That one habit undoes an otherwise solid frost-proof faucet. Before the next cold snap, walk your property, check every outdoor spigot, and confirm each interior shutoff actually turns.
— Maayan
How we can help: services and next steps
A frozen faucet that’s already cracked, or a line that keeps freezing in the same spot, usually needs more than a hair dryer and patience. We handle these calls with extensive hands-on experience behind every visit.

Services offered when you call us:
- Plumbing repair for cracked faucets, damaged valves, and supply lines affected by freeze damage.
- Winterization checks that confirm interior shutoffs work and exterior lines drain properly.
- Plumbing repiping for sections of line damaged beyond a simple fixture swap.
A typical visit starts with locating the damaged section, explaining the repair options in plain terms, and completing the fix the same day whenever possible. If you’re dealing with a burst pipe, a recurring freeze, or just want your outdoor lines checked before winter, reach out through our plumbing repair page to schedule a visit.
FAQ
What to do if an outside faucet is frozen?
Open the faucet first to relieve pressure, then apply gentle heat at the spout with a hair dryer, electric heating pad, or warm towels, working toward the house. Never use an open flame or boiling water, and if you suspect a crack or see water inside a wall, shut off the main and call a licensed plumber.
Will outside faucets freeze at 30 degrees?
A brief dip above freezing rarely freezes a faucet that’s properly drained and disconnected from a hose. Risk climbs with sustained freezing temperatures, especially overnight, and a hose left attached makes freezing far more likely regardless of the exact temperature.
How to fix a freeze-proof outside faucet?
A frost-proof faucet that still froze usually has a hose connected, which traps water and defeats its design, according to USU Extension. Disconnect the hose, thaw the faucet gently from the spout inward, and if it keeps failing, have a plumber inspect the interior shutoff and valve stem.
How to unstick a stuck outdoor faucet?
A stiff handle on an outdoor faucet often means ice is forming inside, so open it gently rather than forcing it, since excess force can crack the stem. Apply gentle heat at the faucet body with a hair dryer or warm towel until the handle turns freely, and avoid pliers or wrenches that can damage the valve.
Sources
- Preventing & Thawing Frozen Pipes | American Red Cross
- MU expert recommends precautions to avoid frozen pipes | MU Extension
- Advice to Prevent Frozen Pipes | USU Extension
- CPSC issues warnings on use of space heaters, offers eight-point safety checklist | CPSC
Recommended
- Cold Climate Outdoor Plumbing Tips for Homeowners
- How to Prevent Frozen Pipes This Winter
- Outdoor Faucet Leaking? Fix It by Finding the Cause
- Step-by-Step Faucet Repair for Pittsburgh Homeowners
