
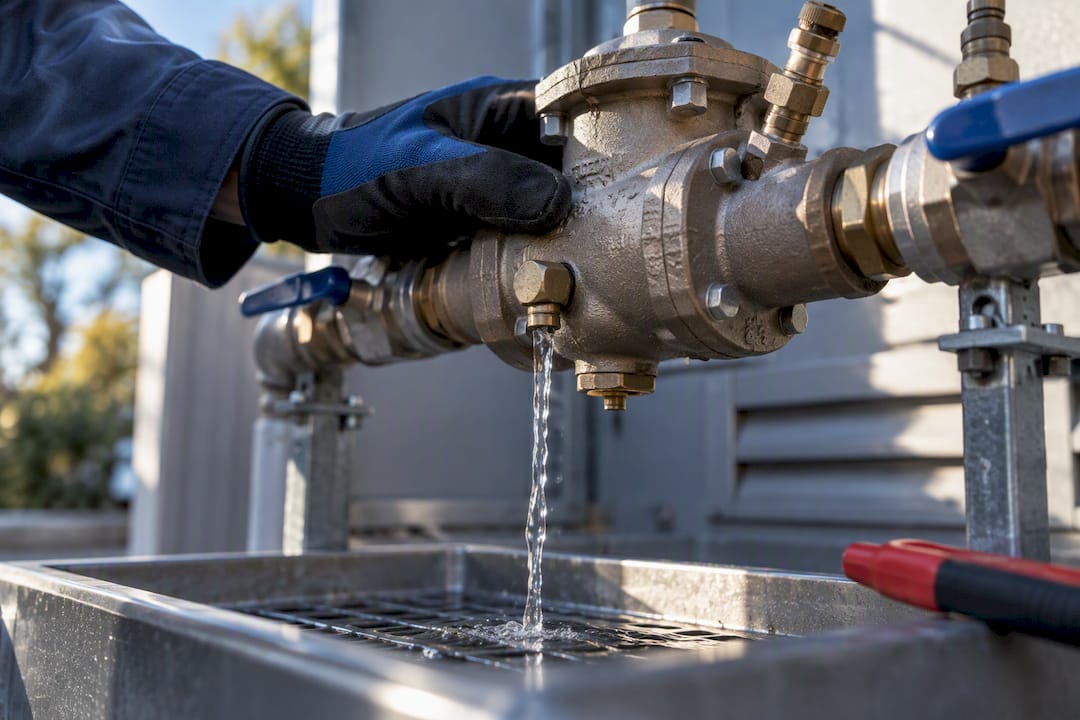
A leaking backflow preventer can be an ordinary sign of wear or a genuine safety problem, and telling the two apart starts with where the water is coming from. If it’s gushing, flooding, or reaching finished space, shut off the water and call a licensed plumber immediately. If it’s a small drip, document what you see and work through a short diagnostic checklist before touching anything.
TL;DR:
- If a backflow preventer is gushing water continuously, shut off the assembly and call a licensed plumber immediately, as this indicates a serious internal failure.
- Normal relief port spitting during pressure fluctuations can be typical for reduced pressure assemblies, but constant discharge suggests a worn or fouled check valve or relief valve issue.
- Leaks from test cocks, union nuts, or body seams often result from debris or seal wear, and cleaning or tightening these parts can sometimes resolve the problem.
- Regular annual testing and record-keeping help identify recurring failures early and prevent water contamination risks associated with failed backflow preventers.
- DIY repairs are limited to external, accessible parts, and internal check valve or relief valve issues require professional servicing to maintain device certification and water safety.
Table of Contents
- Quick diagnostic checklist: find where the water is coming from
- Common causes by device type: RP, DC, PVB, and hose-end preventers
- Immediate steps to take when you find a leak
- DIY fixes homeowners can try and where DIY stops
- What repairs and replacement typically cost, and how long these devices last
- Prevention and maintenance: annual testing and simple homeowner checks
- Detailed diagnostic methods for complex leak sources
- Environmental and health risks of a leaking backflow preventer
- What our technicians look for and why licensed service matters
- How professional backflow testing and repair solves the problem
- Sources
- FAQ
Quick diagnostic checklist: find where the water is coming from
Before you decide whether this is a five-minute fix or a call for backup, narrow down the source. Backflow assemblies have a handful of predictable leak points, and matching the symptom to the spot tells you most of what you need to know.
- Check the relief port on the underside of the valve body: steady dripping or spraying here points to internal wear, while an occasional spit can be normal.
- Inspect body seams and bonnet screws for weeping or corrosion, which usually signals a gasket or seal failure.
- Look at the test cocks and their caps: a loose cap or worn seal often causes a slow, isolated drip.
- Check union nuts and the inlet and outlet piping connections for tightness and corrosion.
- Note the pattern: constant drip, occasional spit, discharge tied to irrigation cycles or pump start-up, or a sudden gush when downstream valves close.
- Take a photo or short video, record the time it happens, and check for a nearby floor drain or electrical equipment that could be at risk.
- If you have local shutoffs on either side of the assembly, close them briefly and see whether the discharge stops.
That last step alone often tells you whether the leak lives inside the assembly or somewhere in the connected piping, which changes who you need to call.
Common causes by device type: RP, DC, PVB, and hose-end preventers
Different backflow assemblies fail in different, fairly predictable ways, and understanding the design helps you read what you’re seeing correctly.
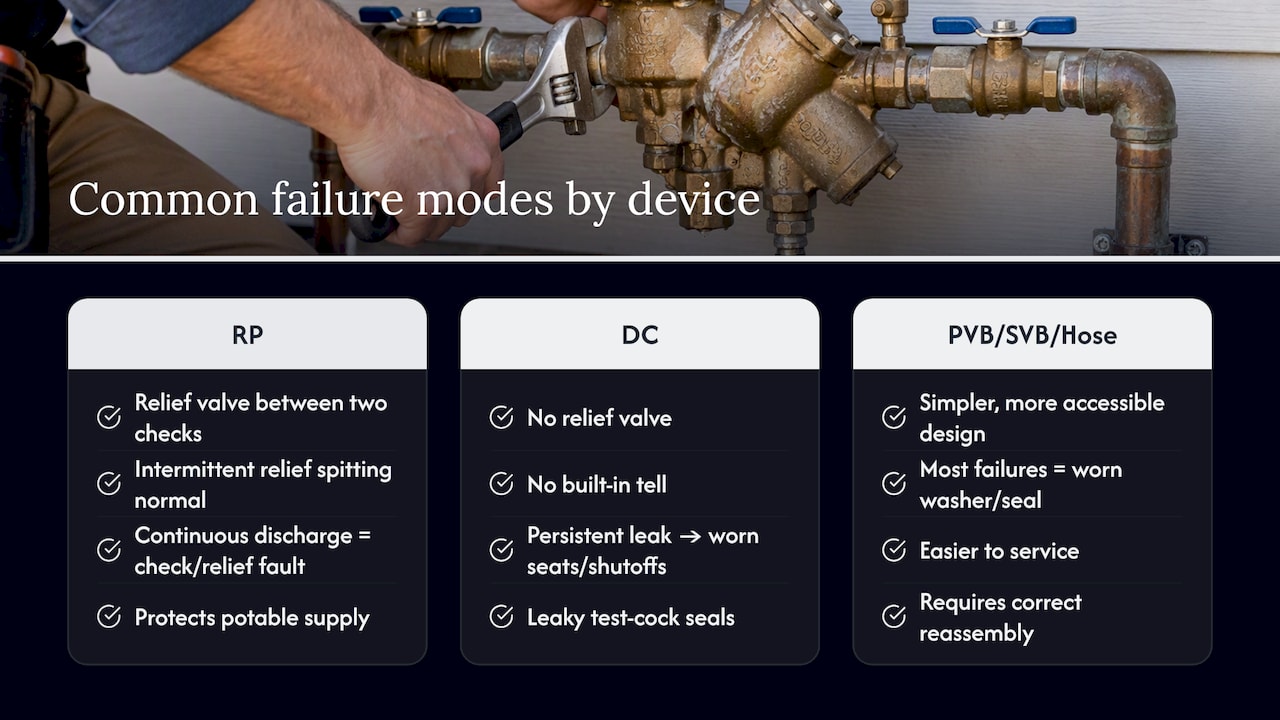
Reduced pressure (RP) assemblies are built with two check valves and a relief valve between them, and that relief valve is designed to open and discharge water when pressure between the checks drops too low, protecting the potable supply from backpressure or backsiphonage. According to a technical review of RP relief valve behavior, intermittent “spitting” from the relief port during pressure fluctuations can be entirely normal, while continual or heavy discharge usually points to a fouled or worn first check, a leaking second check, or a fault in the relief valve itself. That distinction matters: one is the device doing its job, the other is the device asking for repair.
Double check (DC) assemblies have no relief valve and therefore no built-in “tell.” Persistent leakage from a DC assembly more often traces back to seat wear on one of the checks, leaky shutoff valves on either side, or worn test cock seals rather than any dramatic failure.
Pressure vacuum breakers (PVB), spill-resistant vacuum breakers (SVB), and hose-end preventers are simpler and more accessible, and their most common failure is a worn washer or seal rather than an internal check problem. They’re easier to service, but reassembly still has to be done correctly or the leak returns.
Debris carried into the valve body during normal flow is one of the most frequent causes of nuisance dripping, according to manufacturer guidance on backflow preventer drips, and cleaning or servicing the valve often resolves it without any parts replacement. Thermal expansion, pressure fluctuations, backpressure from pumps or boilers, poor original installation, and missing drainage nearby round out the usual suspects across all device types.
Immediate steps to take when you find a leak
Once you’ve spotted active water where it shouldn’t be, the priority shifts from diagnosis to containment.
- Decide between the house main shutoff and a dedicated assembly shutoff: use the assembly shutoffs first if the leak is isolated there, since cutting the main affects every fixture in the building.
- Direct discharge toward a floor drain or outside using a hose if the assembly is actively spraying, and move anything electrical away from the water path.
- Leave the assembly alone otherwise: do not disassemble a reduced pressure assembly yourself, and keep test cocks closed unless a technician tells you to open them.
- Photograph or record the leak, and note what was happening right before it started, such as irrigation running or a pump cycling on.
Pro Tip: Keep a bucket or shallow pan under the relief port permanently if your assembly sits somewhere without a floor drain. It won’t stop a real failure, but it buys you time before ordinary spitting becomes standing water.
DIY fixes homeowners can try and where DIY stops
A handful of backflow preventer problems are genuinely simple to fix yourself, and knowing which ones saves you a service call.
- Tighten loose union nuts or bonnet bolts if they’re clearly the source of a slow seep.
- Replace an external test cock cap or hose washer if that’s where the drip originates.
- Clear visible debris from around the relief port or test cocks.
- Confirm your isolation shutoff valves actually close fully, since a valve that won’t seat properly will mimic an assembly leak.
Beyond that, the limits are real and not just cautious advice. Approved backflow assemblies keep their approval status only when repaired with matching parts installed correctly, and many municipal water suppliers require a certified backflow technician for both testing and internal repairs. Improper reassembly of an internal check or relief valve can compromise the very protection the device exists to provide, which is why this is one plumbing job where “close enough” isn’t acceptable. Call a licensed technician when the relief valve discharges continuously, when a field test comes back failing, when you can’t isolate the leak with local shutoffs, or when there’s any chance contaminated water has reached the potable side.
What repairs and replacement typically cost, and how long these devices last
Costs vary by assembly size and what’s actually wrong, but a few bands hold up across most jobs: a diagnostic visit and field test is the smallest expense, minor repairs like a washer or test cock seal cost less than a rebuild kit covering the internal checks, and a full assembly replacement runs highest, especially on larger commercial-sized units.
- Expect the lowest cost for a straightforward inspection and field test, a moderate cost for parts like seals or a rebuild kit, and the highest cost for full assembly replacement.
- Typical service life runs roughly 5 to 20 years depending on the assembly type, water quality, and usage, with debris, mineral scale, and skipped maintenance all shortening that range.
- Municipal water suppliers generally require annual testing, and keeping around three years of test and repair records is a common recommendation for satisfying supplier audit requirements, since it also helps identify recurring failures early.
Prevention and maintenance: annual testing and simple homeowner checks
Consistent testing and a few habits between visits catch most problems before they become leaks.
- Schedule a field test at least once a year, since state backflow prevention guidance treats annual testing as standard practice and expects test and repair records to be kept and provided to the water supplier on request.
- Retain those records for at least three years, since recurring failures on the same assembly usually point to a water quality or installation issue worth addressing directly.
- Between tests, walk out to the assembly after irrigation runs or noticeable pressure swings and check for fresh drips.
- Keep the area around test cocks clear and accessible so a technician doesn’t have to work around landscaping or stored items.
- For continuous-service systems where downtime isn’t an option, a pit drain or a parallel backup assembly is worth discussing with a plumber so testing or repair doesn’t interrupt supply.
Our own step-by-step backflow prevention guide walks through these homeowner checks in more detail if you want a printable version to keep near the assembly.
Detailed diagnostic methods for complex leak sources
Most drips resolve with the checklist above, but some leaks resist a simple visual inspection, especially intermittent ones tied to pressure changes rather than a constant flow.
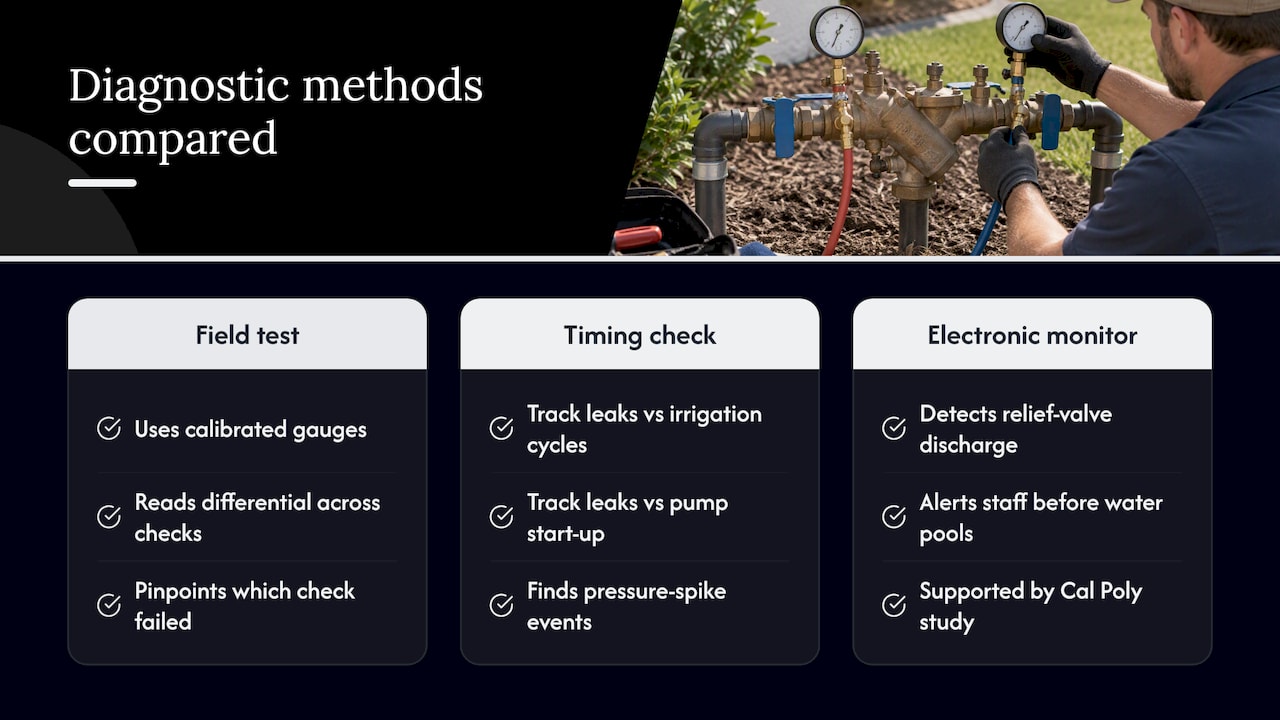
A field test using calibrated gauges on the test cocks is the only way to measure the actual pressure differential across each check valve, and it’s what separates a hunch from a confirmed diagnosis. Technicians read the differential across the first and second checks separately, which pinpoints which check has failed rather than just confirming that something has.
For assemblies that discharge only occasionally, tracking the timing against irrigation cycles, pump start-up, or nearby water use often reveals that the “leak” is a pressure spike event rather than a worn part. Some larger reduced pressure assemblies now support electronic monitoring add-ons that detect relief valve discharge and alert facility staff before water accumulates, a development covered in a Cal Poly study on backflow sensor design, which is worth considering for properties where standing water would go unnoticed.
It’s also worth knowing that a failed field test and a failed assembly aren’t automatically the same thing. Industry technical discussion draws a clear line between an assembly that fails to meet test thresholds and one that has actually let contaminated water pass, since the pass or fail line is set well ahead of real backflow risk. That gap doesn’t make a failed test something to ignore, but it explains why a technician still runs a full evaluation rather than treating every failed reading as an emergency.
Environmental and health risks of a leaking backflow preventer
The reason backflow preventers exist at all is to stop contaminated water from siphoning back into the drinking supply, so a leaking or failing assembly isn’t just a maintenance nuisance.
A relief valve discharging normally during a pressure event is doing exactly what it’s designed to do, releasing water rather than allowing contamination through. The risk climbs when the underlying check valves themselves are worn or fouled, since that’s the scenario where backpressure or backsiphonage could actually pull irrigation chemicals, standing water, or cross-connected non-potable sources back into household or building plumbing. Left unaddressed, that’s a public health exposure, not just a repair bill.
There’s a property-level cost too. Water pooling around an assembly, especially indoors or near a mechanical room, promotes mold growth and can damage flooring, drywall, and stored equipment over time. Outdoor leaks near landscaping can also waste a meaningful volume of water continuously without anyone noticing, since a slow drip rarely draws attention the way a burst pipe does. Treating any persistent discharge as worth investigating, rather than something to live with, protects both your water quality and your building.
What our technicians look for and why licensed service matters
After 30 years of plumbing work in and around Pittsburgh, our technicians treat every backflow call as a diagnostic job first, not a parts swap. We rely on photos, video, and actual field test values rather than guesswork to decide whether an assembly needs cleaning, a rebuild kit, or full replacement.
The checklist stays consistent every visit: are the test cocks accessible, do the isolation shutoffs actually close, what do the recorded test values show, and is there visible debris or check wear inside the body. A proper field test is what separates normal relief valve behavior from an internal failure, and getting that call right is what keeps an assembly compliant and your water safe.
— Maayan
How professional backflow testing and repair solves the problem
A leaking assembly you can’t confidently diagnose yourself is exactly the situation our backflow testing service covers, without the guesswork of trying to interpret relief valve behavior on your own.

A typical visit includes:
- An on-site inspection and field test using calibrated equipment to identify the failing component.
- A clear repair-or-replace recommendation based on the actual test readings, not assumptions.
- Documentation prepared for your water supplier, so your records stay current for annual compliance.
Hiring a licensed technician also protects the assembly’s approved status, since repairs done with the correct parts and procedure are what keep it certified. If the leak is active and causing damage right now, our plumbing repair team also handles emergency visits. Reach out through our backflow testing page to schedule a test or repair.
Sources
For readers who want the underlying technical detail, the Ohio EPA backflow prevention manual and Cross Talk’s relief valve discussion cover assembly design and testing standards in depth. For a general primer on spotting leaks early, Dakcentrale Holland’s leak identification guide offers useful supplementary context. Your local water supplier sets the exact testing and repair rules for your property, so confirm details with them directly.
- Relief Valve Discharge — Cross Talk (2008)
- Backflow Prevention and Cross-Connection Control — Ohio EPA manual (2015)
- Project: External sensor for detecting discharge on Zurn Wilkins RP Backflow Preventer — Cal Poly
- What causes nuisance dripping of backflow preventers and how is it correctable? — Caleffi (2014)
FAQ
Can I repair my own backflow preventer?
You can handle minor external tasks yourself, like tightening a union or replacing a worn washer, but internal repairs to the check valves or relief valve usually require a certified technician. Many municipal suppliers require licensed work to keep the assembly’s approval valid and to protect potable water.
What is the life expectancy of a backflow valve?
Most backflow assemblies last roughly 5 to 20 years depending on the type, water quality, and how well they’re maintained. Debris, mineral scale, and skipped annual testing all tend to shorten that range.
How much does it cost to fix a backflow preventer?
Costs vary by what’s wrong: a diagnostic visit and field test is the least expensive step, parts like seals or a rebuild kit cost more, and full assembly replacement runs highest. AG Plumbing’s backflow testing service can provide an exact quote after inspecting your specific assembly.
Why is my backflow preventer gushing water?
A reduced pressure assembly gushing water from the relief port, rather than spitting occasionally, usually means a fouled or worn check valve or a relief valve fault rather than normal pressure fluctuation. Shut off the assembly’s local valves if possible and call a licensed plumber, since continuous discharge signals an internal failure that needs a proper field test to diagnose.
Recommended
- Step-by-Step Backflow Prevention for Homeowners
- Backflow Prevention: What It Is and Why It Matters
- Leak Detection Tips for Homeowners: 10 Quick Checks
