TL;DR:
- Proper water heater troubleshooting involves diagnosing issues such as no hot water or leaks by systematically checking power, fuel supply, and internal components. Homeowners can often resolve problems safely by following safety precautions, documenting the unit’s details, and using appropriate tools, but complex issues like gas leaks require professional assistance. Regular maintenance, including flushing the tank and replacing the anode rod, can prevent most malfunctions and extend the lifespan of the unit.
Water heater troubleshooting is the process of diagnosing and fixing common faults such as no hot water, inconsistent temperature, leaks, or unusual noises by checking power or fuel supply, thermostat settings, and internal components in a systematic order. Most homeowners can resolve the majority of these issues without a service call, provided they follow the right diagnostic steps and observe basic safety precautions. Before touching anything, turn off the power at the breaker for electric units or set the gas valve to the pilot position for gas models. Having your unit’s brand, model number, and age on hand speeds up every step that follows.
How to troubleshoot water heater issues: start with type and preparation
The single most important step before any diagnosis is identifying whether you own an electric or gas water heater. Diagnostic logic differs completely between the two: electric units follow a breaker, reset button, thermostat, and heating element sequence, while gas units follow a gas supply, pilot light, burner, and thermocouple sequence. Mixing up the approach wastes time and creates unnecessary risk.
Safety preparations before you begin
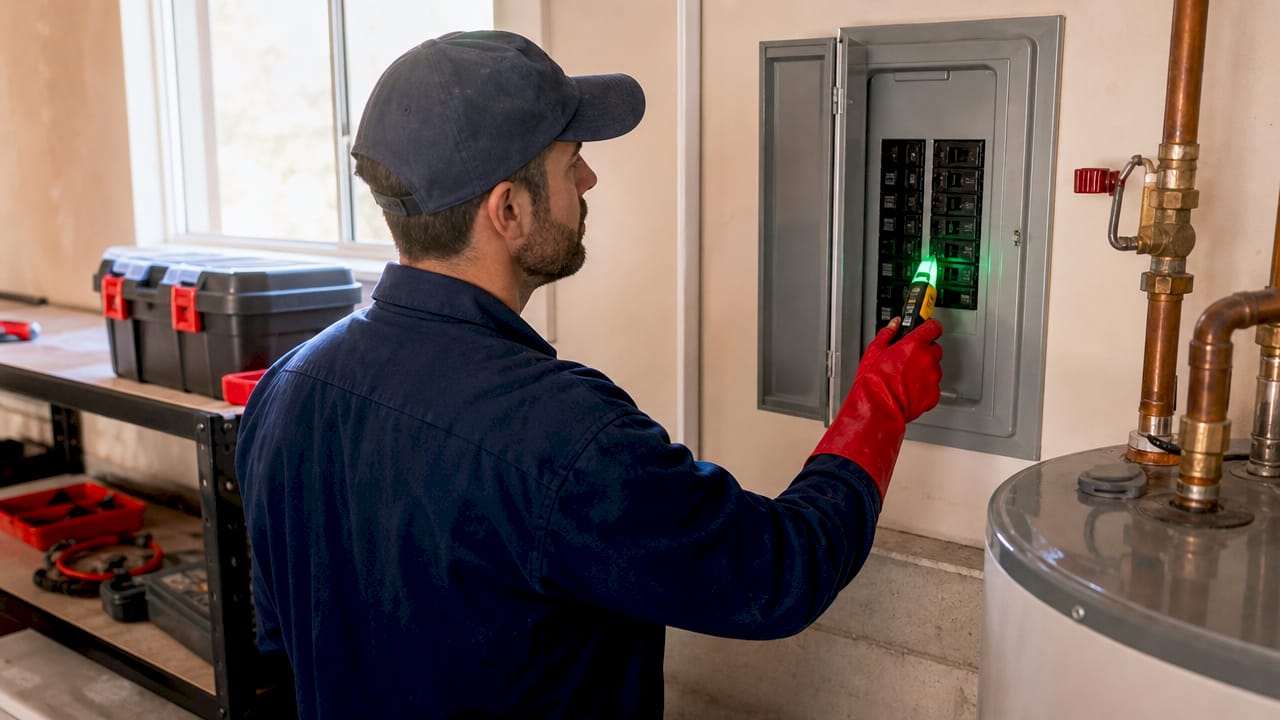
Switch off the circuit breaker for electric heaters or turn the gas valve to the pilot setting before opening any access panels. Use a non-contact voltage tester to confirm power is off before touching wiring. Work only in dry conditions. Water and electricity together cause electrocution, not just shocks.
What to document before you start
Rheem recommends walking around the unit and noting any pooling water, rust stains, or condensation before touching controls. Small surface condensation is normal, but standing water at the base signals tank corrosion or a failed valve. Write down the brand, model number, serial number, installation year, and any visible damage. This information cuts diagnostic time in half and gives a licensed plumber everything needed if the repair goes beyond DIY scope.
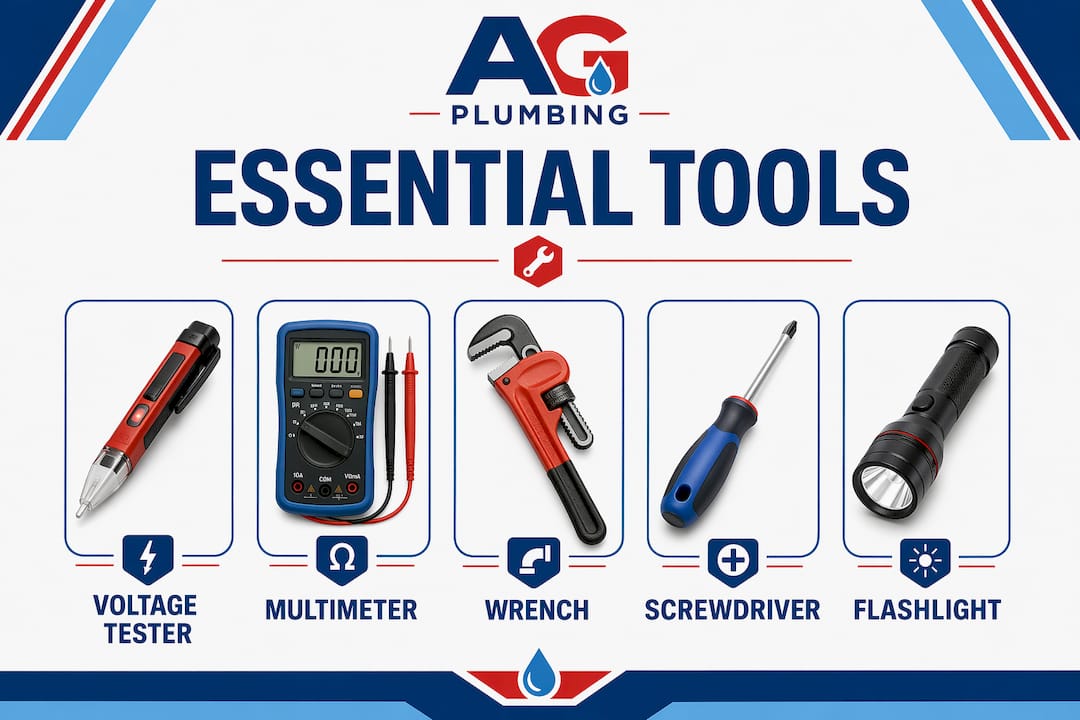
Tools you need on hand
| Tool | Purpose |
|---|---|
| Non-contact voltage tester | Confirms power is off before touching wiring |
| Multimeter | Tests heating elements and thermocouple output |
| Garden hose | Connects to drain valve for sediment flushing |
| Adjustable wrench | Tightens fittings or removes anode rod |
| Flathead screwdriver | Opens access panels and adjusts thermostat dials |
Pro Tip: Take photos of all wiring connections before disconnecting anything. This makes reassembly faster and eliminates guesswork.
How do you fix a water heater not heating? (Electric models)
Power and thermostat failures are the most common causes of no hot water in electric units. Work through this sequence before assuming a component has failed.
-
Check the circuit breaker. Go to your electrical panel and look for a tripped breaker labeled “water heater.” Reset it by switching it fully off, then back on. If it trips again immediately, stop. A repeated breaker trip signals a wiring fault or shorted heating element, not a one-time glitch.
-
Reset the high-temperature cutoff. Remove the upper access panel on the side of the tank. Press the red reset button firmly until you hear a click. Replace the panel and wait 30 minutes. This button trips when water exceeds a safe temperature and often restores operation on its own.
-
Check thermostat settings. Both upper and lower thermostats should be set to approximately 120°F. Settings above 120°F increase energy costs and scalding risk without providing meaningful benefit.
-
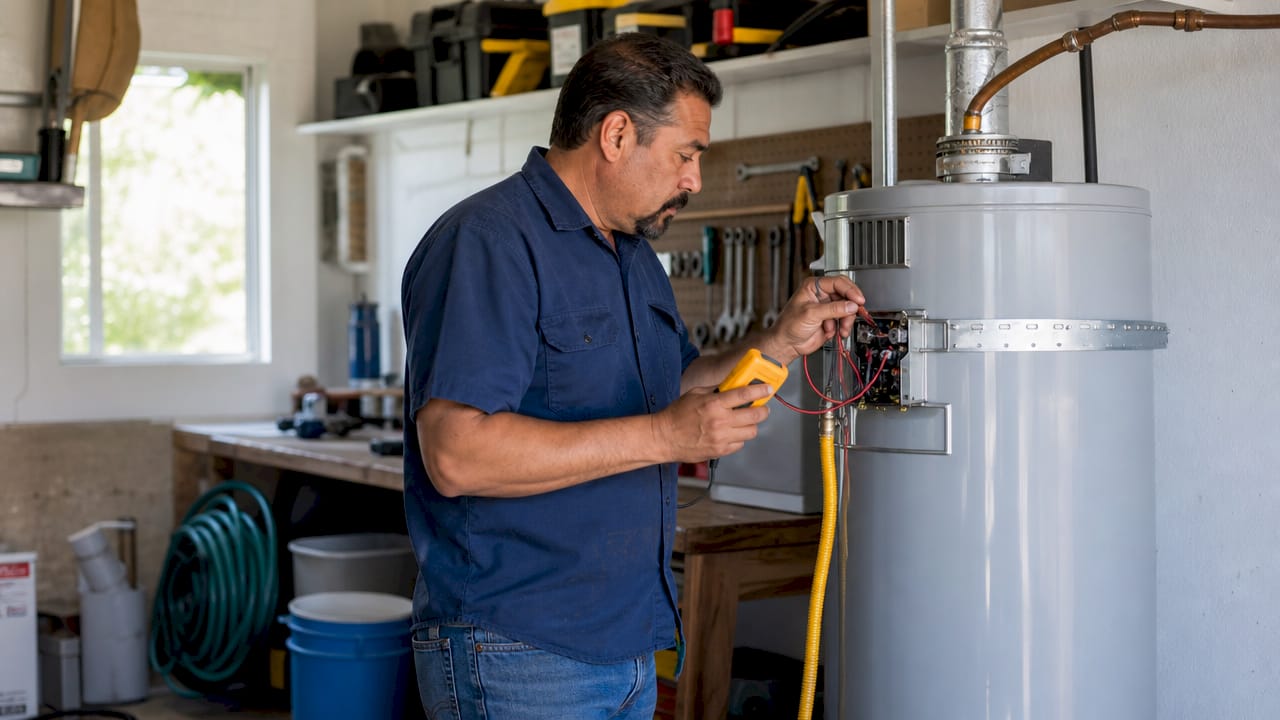
Test the heating elements. With power confirmed off at the breaker, disconnect the wires from each element and use a multimeter set to resistance (ohms). A reading between 10 and 30 ohms indicates a working element. A reading of zero or infinity means the element has failed and needs replacement.
-
Inspect for visible damage. Burn marks, corrosion, or a visibly broken element confirm replacement is needed. Heating elements for most Rheem, A.O. Smith, and Bradford White units are widely available at hardware stores.
Pro Tip: If both elements test fine but you still have no hot water, the problem is almost certainly a failed thermostat. Thermostats are inexpensive and straightforward to swap out once power is confirmed off.
How do you diagnose a gas water heater that won’t heat?
Gas water heater problems concentrate in three areas: gas supply, the pilot light, and the thermocouple. Work through them in that order.
-
Verify the gas supply. Check that the gas valve lever on the supply line is parallel to the pipe, which means it is open. If other gas appliances in your home are also not working, contact your gas utility immediately.
-
Check the pilot light. Look through the viewing window at the base of the unit. A healthy pilot flame burns steady and blue. A yellow or orange flame indicates incomplete combustion, often from a dirty burner or restricted air supply.
-
Relight the pilot. Turn the gas valve knob to “Pilot.” Press and hold the knob down while pressing the igniter button repeatedly until the flame catches. Hold the knob down for 30 to 60 seconds after ignition to allow the thermocouple to heat up, then slowly release and turn to your desired temperature setting.
-
Test the thermocouple. If the pilot lights but won’t stay lit, the thermocouple is the likely culprit. The thermocouple is a safety device that detects the pilot flame and keeps the gas valve open. A thermocouple reading under 20mV on a multimeter confirms failure. Replacement thermocouples cost under $20 at most hardware stores.
-
Inspect the burner. Dust and debris accumulate on burner ports over time, causing weak or uneven flames. Turn off the gas completely, allow the unit to cool, and use a soft brush to clean the ports.
Safety warning: If you smell gas at any point during this process, do not attempt to relight the pilot. Leave the house immediately, avoid using light switches or phones inside, and call your gas utility from outside. Gas leaks require professional intervention, not DIY repair.
Pro Tip: Dirty burners are a surprisingly common cause of pilot failure that most homeowners overlook. A quick annual cleaning with a soft brush takes five minutes and prevents a service call.
What causes water heater leaks, noises, and temperature problems?
These three symptom categories cover the bulk of remaining water heater issues and each has a clear diagnostic path.
Rumbling and popping noises
Rumbling or popping sounds from the tank almost always indicate sediment buildup at the bottom. Minerals from hard water settle over time, and the heating element or burner forces water through the sediment layer, creating those sounds. This reduces efficiency and accelerates element wear. The fix is a full tank flush.
To flush the tank: turn off the heater and cold water supply, connect a garden hose to the drain valve, run the other end to a floor drain or outside, open a hot water faucet in the house to prevent a vacuum, then open the drain valve. Flush until the water runs clear, which confirms sediment removal. This procedure both diagnoses and solves the problem in one step.
Diagnosing leaks by location
- Leaks at pipe connections or fittings: Tighten with a wrench. If tightening does not stop the drip, replace the fitting or valve. This is a straightforward DIY repair.
- Leaks from the temperature pressure relief (TPR) valve: The valve may be releasing excess pressure normally, or it may have failed. Test by lifting the lever briefly. If it continues dripping after release, replace the valve.
- Leaks from the tank base: Tank base leaks signal corrosion and mean the tank itself has failed. No repair restores a corroded tank. Replacement is the only option.
Temperature and water quality problems
Discolored or rust-colored water points to a corroding anode rod or tank interior. Foul-smelling water, often described as a rotten egg odor, indicates bacterial growth inside the tank, which is more common when thermostats are set too low. Raising the thermostat to 120°F kills most bacteria. For persistent odor, flush the tank and consider a temporary increase to 140°F for a few hours, then return to 120°F.
Pro Tip: If your water heater is more than 10 years old and showing multiple symptoms at once, repair costs often exceed the value of the unit. A water heater upgrade frequently pays for itself within a few years through energy savings alone.
Water heater maintenance tips that prevent most problems
Routine maintenance eliminates the majority of common water heater faults before they develop. These tasks take less than two hours per year and extend unit lifespan significantly.
- Flush the tank annually. Annual flushing removes sediment that reduces efficiency and causes noise. Set a calendar reminder each fall before heating season.
- Replace the anode rod every 3 to 5 years. The anode rod is a magnesium or aluminum rod that sacrifices itself to prevent tank corrosion. Once it is depleted, the tank corrodes instead. Anode rod replacement is one of the highest-value maintenance tasks a homeowner can perform.
- Test the TPR valve twice a year. Lift the lever briefly and confirm water flows, then stops cleanly when released. A valve that drips continuously after testing needs replacement.
- Keep the thermostat at 120°F. This setting balances safety and efficiency. Higher settings increase energy bills and scalding risk. Lower settings encourage bacterial growth.
- Check for condensation around the unit. Light surface condensation is normal in humid conditions. Persistent pooling at the base is not. Address pooling immediately to determine whether it is a fitting leak or a tank failure.
Pro Tip: Keep a simple maintenance log taped to the side of the unit. Record flush dates, anode rod replacements, and any repairs. This log is invaluable when a plumber needs to assess the unit’s history quickly.
Key takeaways
Systematic water heater diagnostics, starting with power or fuel supply and moving through thermostats, components, and sediment, resolves most issues without a professional call.
| Point | Details |
|---|---|
| Identify heater type first | Electric and gas units require completely different diagnostic sequences. |
| Check power or gas supply before components | A tripped breaker or closed gas valve causes most no-heat calls. |
| Flush annually to prevent noise and inefficiency | Sediment buildup is the leading cause of rumbling sounds and reduced heating. |
| Replace anode rod every 3 to 5 years | A depleted rod allows tank corrosion, which ends the unit’s lifespan. |
| Tank base leaks mean replacement, not repair | Corrosion at the tank base cannot be patched and requires a new unit. |
What 30 years of plumbing calls taught me about water heaters
The most expensive water heater repairs I have seen in Pittsburgh all shared one thing: the homeowner waited. A rumbling noise that started in January became a flooded utility room by March. A pilot light that needed relighting every few weeks turned into a full gas valve replacement that could have been avoided with a $15 thermocouple swap six months earlier.
The homeowners who avoid those calls are the ones who treat their water heater like a car. They flush it once a year, check the anode rod, and call us when something is off rather than when something has failed. That difference in timing is the difference between a $150 service visit and a $1,200 emergency replacement.
I also want to be direct about limits. Gas leaks, repeated breaker trips, and tank base leaks are not DIY territory. The safety risk is real, and the cost of getting it wrong is not worth the savings. Knowing when to stop and call a licensed plumber is not a failure. It is the right call.
One habit I recommend to every homeowner: write the unit’s brand, model, and installation date on a piece of tape and stick it to the side of the tank. When you call us, that information cuts the diagnostic conversation from 10 minutes to 30 seconds. Small preparation, real impact.
— Maayan
Need expert water heater help in Pittsburgh?
When troubleshooting reaches its limits, Ag-plumbing is the team Pittsburgh homeowners have trusted for 30 years. Whether you need a thermocouple swap, a full tank replacement, or a scheduled maintenance visit before problems develop, AG Heating, Cooling & Plumbing handles it with the same crew that has been serving the Pittsburgh, PA area since the 1990s.
Ag-plumbing offers water heater repair and maintenance for both electric and gas units across Pittsburgh and the surrounding areas. For homeowners who want to stay ahead of breakdowns, scheduling a preventive maintenance visit costs a fraction of emergency repair. Contact Ag-plumbing through ag-plumbing.com to book a service appointment or get a same-day assessment for urgent issues.
FAQ
Why does my electric water heater have no hot water?
Check the circuit breaker first, then press the red reset button on the upper thermostat. If the breaker trips again after resetting, a failed heating element or wiring fault is the likely cause and requires component testing or professional service.
How do I know if my water heater thermocouple is bad?
A pilot light that ignites but won’t stay lit is the clearest sign of thermocouple failure. Confirm it with a multimeter: a reading under 20mV means the thermocouple needs replacement, which is a straightforward repair costing under $20 in parts.
What does rumbling from my water heater mean?
Rumbling or popping sounds indicate sediment buildup at the bottom of the tank. Flushing the tank with a garden hose through the drain valve until the water runs clear typically resolves the noise and restores heating efficiency.
When should I replace instead of repair my water heater?
Replace the unit when the tank base is leaking, the unit is over 10 years old with multiple faults, or repair costs exceed half the price of a new unit. Tank corrosion cannot be repaired and always requires full replacement.
Is it safe to troubleshoot a gas water heater myself?
Basic checks like verifying the gas valve position, relighting the pilot, and testing the thermocouple are safe for homeowners who follow the manufacturer’s instructions carefully. Any smell of gas requires immediate evacuation and a call to your gas utility, not a DIY fix.
Recommended
- Common Plumbing Repair Issues and How to Fix Them – AG-Plumbing
- Emergency Plumbing Guide: Quick Solutions for Homeowners – AG-Plumbing
- Service water heaters: efficiency guide for PA homes – AG-Plumbing
- Why flushing your water heater saves Pittsburgh homes money – AG-Plumbing