TL;DR:
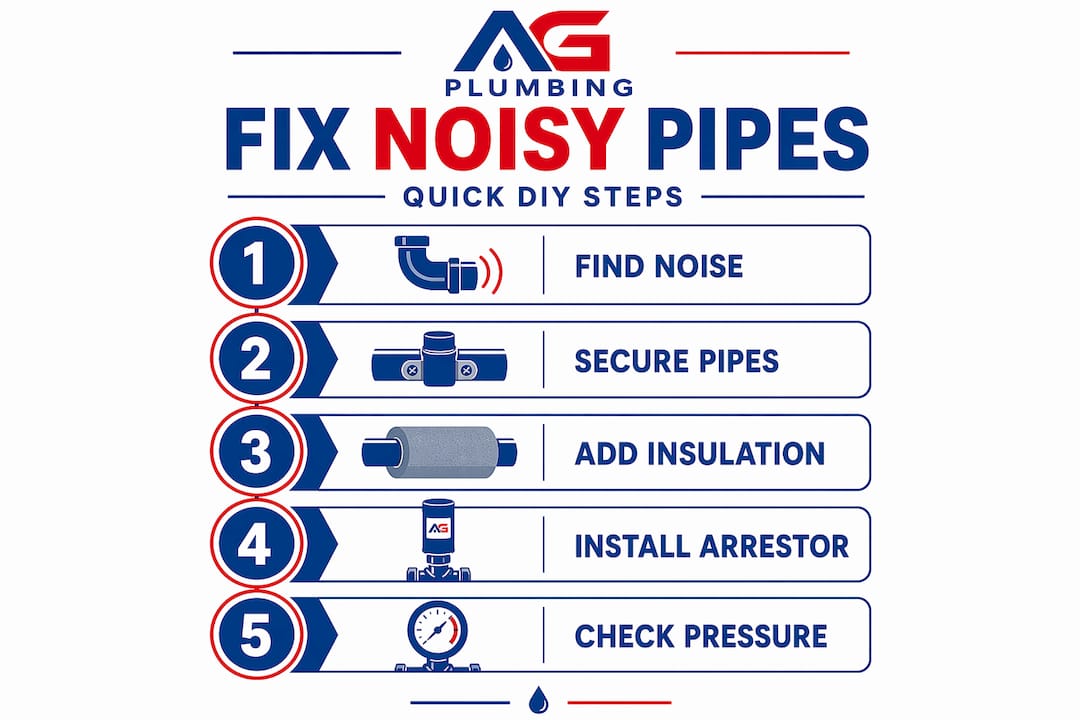
- Most noisy pipes are caused by water hammer, loose supports, or high water pressure, each with straightforward fixes. Securing loose pipes, installing water hammer arrestors, and managing water pressure can significantly reduce plumbing noise and stress. Persistent or complex issues require professional assessment to prevent plumbing damage and ensure system health.
That banging, knocking, or rattling sound coming from your walls isn’t something you should learn to live with. If you’re trying to figure out how to fix noisy pipes, you’re dealing with one of the most common plumbing complaints in residential homes. The good news: most pipe noises have a clear cause, and most of those causes have a straightforward fix. This guide walks you through diagnosing what’s happening, tackling the most effective DIY repairs, and knowing when it’s time to call in a pro.
Table of Contents
- Key takeaways
- How to fix noisy pipes: causes and prep
- Securing and insulating loose pipes
- Stopping water hammer with arrestors and pressure control
- Troubleshooting when DIY fixes don’t work
- Keeping your pipes quiet long-term
- My take on what most homeowners get wrong
- When it’s time to bring in the professionals
- FAQ
Key takeaways
| Point | Details |
|---|---|
| Diagnose before you fix | Identify whether the noise is banging, rattling, or vibrating to target the right repair. |
| Secure loose pipes first | Loose pipe mounting causes the majority of pipe noise and is the easiest fix to start with. |
| Install water hammer arrestors | Arrestors absorb pressure surges at the source, stopping the shockwave before it travels. |
| Manage your water pressure | Keeping pressure between 40 and 60 psi dramatically reduces pipe stress and noise. |
| Know when to call a plumber | Persistent noise after DIY fixes, discolored water, or visible corrosion warrants professional help. |
How to fix noisy pipes: causes and prep
Before you grab a wrench, you need to know what you’re dealing with. Pipe noises are not all created equal, and treating the wrong problem wastes both time and money.
The most common culprits
Water hammer is the sharp banging sound that happens right after you shut off a faucet or an appliance stops filling. It’s caused by quick valve closures creating a pressure surge that sends a shockwave through your plumbing. Common triggers include washing machines, dishwashers, and any fixture with a fast-closing valve.
Loose pipes are responsible for a different kind of noise. When water flows through a pipe that isn’t secured tightly against a joist, stud, or bracket, the pipe vibrates. That vibration travels through the framing of your house and amplifies. Loose pipe mounting accounts for up to 80% of pipe noise in homes, which is why this is always the first thing to check.
High water pressure quietly creates noise over time. When your household pressure runs above 80 psi, pipes hum, rattle, and eventually develop wear at joints and fittings.
What you’ll hear and what it means
- Banging after appliance shutoff: Water hammer from pressure surges
- Rattling or vibrating during flow: Loose pipe supports
- Humming throughout the system: High water pressure
- Ticking or creaking: Thermal expansion in hot water pipes
- Gurgling from drains: Air in the line or partial blockage
What to have on hand before starting
| Item | Purpose |
|---|---|
| Pipe clamps and straps | Secure loose pipes to framing |
| Foam or rubber pipe insulation | Cushion pipes and reduce vibration transmission |
| Water hammer arrestor | Absorb pressure surges near appliances |
| Pressure gauge | Measure current water pressure at a hose bib |
| Screwdriver and adjustable wrench | Basic installation and tightening |
Pro Tip: Before doing anything else, attach a pressure gauge to an outdoor hose bib and check your home’s water pressure. If it reads above 80 psi, that single number explains most of the noise in your system.
Securing and insulating loose pipes
This is where most homeowners should start. Fixing noisy plumbing often comes down to stopping pipes from physically moving when water flows through them.
Step-by-step: securing loose pipes
-
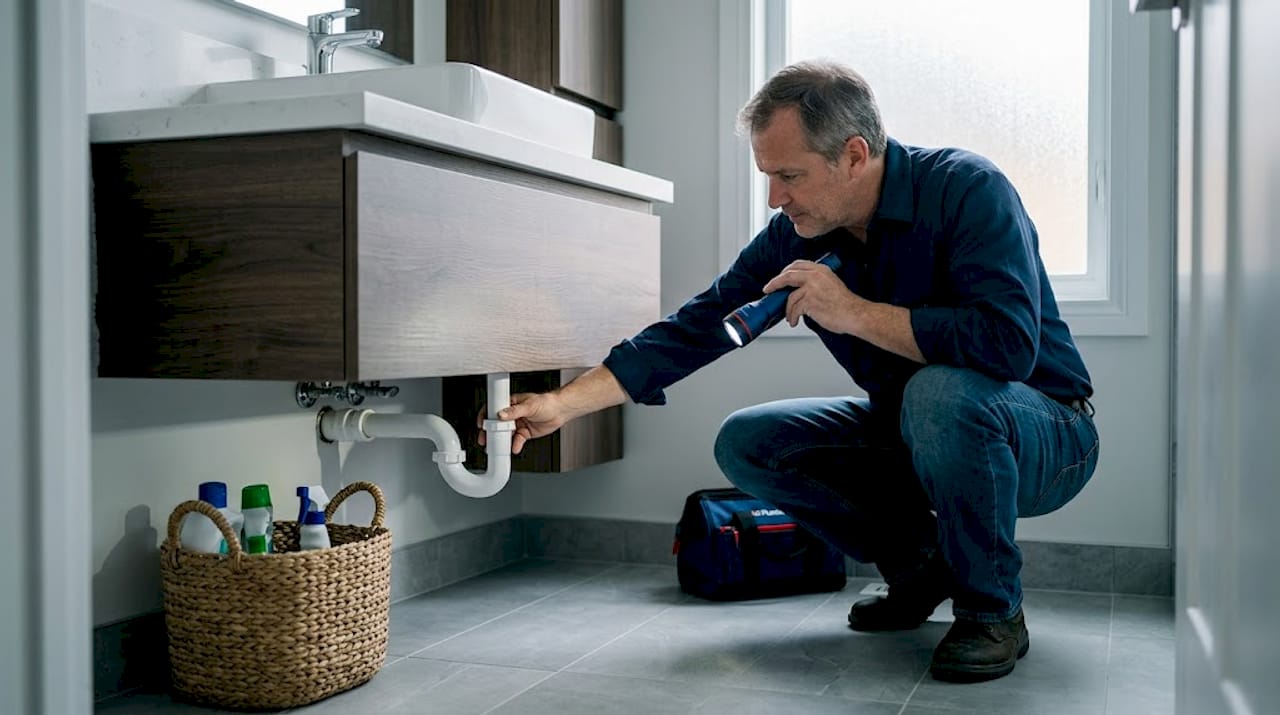
Locate the noise source. Turn on the water and listen carefully. Walk through your basement, crawlspace, or utility room while a helper runs faucets. Mark any pipes that rattle or vibrate noticeably.
-
Inspect existing supports. Look at how the pipe is currently attached. If it’s resting on a joist without a clamp, or if an old clamp has loosened, that’s your fix right there.
-
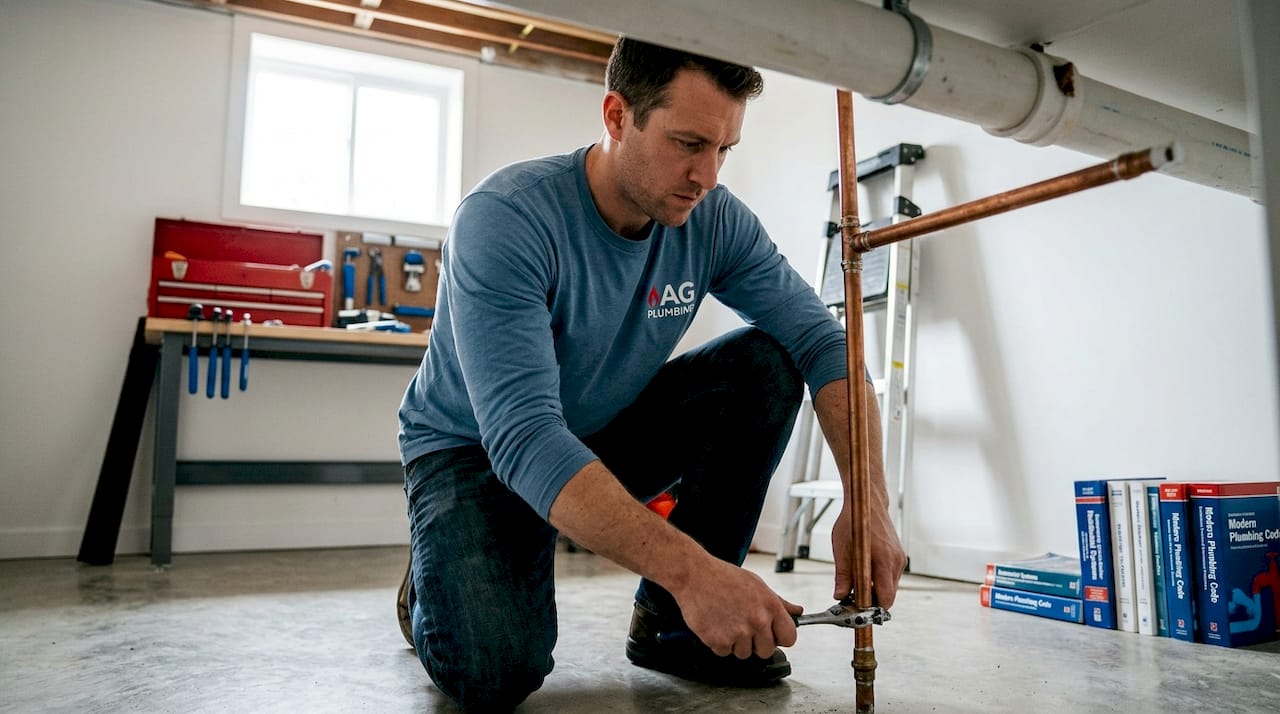
Install pipe clamps or straps. For exposed pipes in a basement or utility area, attach cushioned pipe clamps to the nearest joist or stud. Space them every 4 to 6 feet for copper pipes, and every 3 feet for plastic pipes. Snug is enough. You do not want to overtighten and restrict natural movement.
-
Add rubber or foam insulation between the pipe and its support. Even when a pipe is properly clamped, direct metal-to-metal contact transmits vibration. A rubber-lined clamp or a strip of foam taped between the pipe and the bracket breaks that vibration path.
-
Wrap pipes near living spaces with sound-absorbing insulation. Foam or fiberglass insulation reduces noise transmission and adds thermal benefit to hot water lines. Split-sleeve foam insulation is the easiest to install; it snaps around the pipe without any cutting tools.
-
Test after each fix. Run the water again before moving to the next section. This tells you exactly how much each change helped and prevents you from over-engineering the repair.
Pro Tip: For pipes inside walls that you can’t easily reach, try adding a piece of adhesive foam weatherstripping between the pipe and any nearby framing it contacts. Slip it into the access point with a flat tool before securing it. It’s not pretty, but it works.
A mistake worth avoiding: securing only one section of a long pipe run. Vibration is like water. It finds the path of least resistance. If you clamp the middle section but leave the ends loose, the noise simply moves to the next contact point. Secure the whole run.
Stopping water hammer with arrestors and pressure control
If securing the pipes didn’t fully quiet noisy pipes, water hammer is likely still at play. This requires a different category of fix.
How water hammer arrestors work
A water hammer arrestor is a small device installed on your supply line near the offending fixture. Inside the arrestor, a compressible diaphragm or piston absorbs the pressure surge the moment a valve closes. Instead of that energy slamming through your pipes, the arrestor converts it into harmless compression. Think of it as a shock absorber built directly into your plumbing.
Quick-closing solenoid valves in washing machines and dishwashers are the number one source of water hammer in residential homes. If your banging noise follows a wash cycle, that’s your diagnosis confirmed.
Step-by-step: installing a water hammer arrestor
- Shut off the water supply to the fixture or appliance where the noise originates.
- Disconnect the supply hose from the back of the appliance (washing machine hoses, for example).
- Thread the arrestor onto the supply valve outlet. Most modern screw-on arrestors require no special tools. Hand-tight plus a quarter turn with pliers is sufficient.
- Reconnect the supply hose to the arrestor’s outlet port.
- Restore water supply and run a test cycle. The banging should stop immediately or reduce significantly.
Pro Tip: Placement matters more than most guides admit. For effective water hammer arrestor performance, install near the noise source and match the device’s pipe diameter rating. An arrestor installed six feet away from the problem valve absorbs far less of the shockwave than one directly at the valve.
Managing water pressure with a PRV
If your water pressure consistently runs high, a pressure-reducing valve is the most effective long-term solution. A PRV is installed on the main supply line where it enters your home. Target a setting between 40 and 60 psi. Most PRVs are adjustable with a simple setscrew and locknut, though replacing a failed PRV is a task best left to a licensed plumber.
| Problem | Likely Fix | DIY-Friendly? |
|---|---|---|
| Banging after appliance shutoff | Water hammer arrestor | Yes |
| Rattling during water flow | Pipe clamps and insulation | Yes |
| Whole-house humming | Pressure-reducing valve adjustment | Moderate |
| Gurgling or slow drain noises | Clear blockage with vinegar and baking soda | Yes |
| Persistent noise after all fixes | Professional plumbing assessment | No |
Troubleshooting when DIY fixes don’t work
You’ve secured the pipes. You’ve installed an arrestor. The noise is still there. At this point, pipe noise troubleshooting shifts from “what can I fix” to “what is this telling me.”
Persistent banging that doesn’t respond to standard fixes can indicate serious plumbing issues including deteriorating joints, hidden leaks, or systemic pressure problems. Warning signs that warrant professional attention include:
- Discolored or rusty water from any tap
- Visible corrosion on exposed pipes or at connection points
- Water pressure that fluctuates dramatically between fixtures
- Reduced flow at multiple fixtures simultaneously
- Any noise accompanied by a warm spot on the wall or ceiling
It’s also worth knowing that tightening pipe supports reduces noise transmission, but if pressure surges persist, an arrestor installation is necessary for a lasting fix. The two problems often coexist, and treating only one leaves the other to keep causing damage.
You can find a helpful plumbing warning signs guide that covers what pipe-related sounds tend to signal larger system problems. It’s useful reference material before you decide whether to proceed with more DIY work or make the call.
Keeping your pipes quiet long-term
Fixing the immediate noise is only half the job. The other half is making sure it doesn’t come back.
- Inspect pipe supports twice a year. Thermal cycling, especially in unheated spaces, gradually loosens clamps over time.
- Check water pressure annually. Pressure regulators drift. A $10 gauge takes 60 seconds to confirm your system is still within range.
- Flush air chambers and clean arrestors. Air chambers can become waterlogged over time. Shut off the main supply, open the lowest fixture in the home, and let the system drain to restore the air pocket.
- Look for early corrosion at joints. Catching a corroding fitting before it fails is the difference between a $20 repair and a flooded room.
- Use vinegar and baking soda to clear minor drain slowdowns that create pressure imbalances and gurgling sounds. Non-chemical methods protect pipe integrity while keeping flow unrestricted.
- Keep an eye on temperature changes. Hot water pipes expand and contract. If yours run through tight framing, seasonal creaking is common. Adding a foam sleeve in those contact zones prevents the ticking from returning.
For a deeper reference on keeping your plumbing in shape, Ag-plumbing’s plumbing tips for Pittsburgh homeowners covers pressure management, insulation choices, and hardware upgrades specific to the region’s climate.
My take on what most homeowners get wrong
I’ve watched a lot of homeowners go through this process, and the single most common mistake I see is treating pipe noise as one problem when it’s almost always two.
Someone hears banging, they go online, they read about water hammer, and they install an arrestor. The banging gets quieter but doesn’t stop. So they assume the arrestor didn’t work and call a plumber. Nine times out of ten, the arrestor worked fine. The remaining noise is vibration from a loose support that was always there but masked by the louder banging. The fix needed both.
What I’ve found is that the most durable pipe noise solutions combine mechanical stabilization with hydraulic mitigation. You secure the pipes so they can’t vibrate, and you absorb the pressure surges so there’s nothing pushing them to vibrate in the first place. Skip either step and you’re doing half a job.
I’d also push back on the idea that noisy pipes are just an annoyance. In my experience, a pipe that’s been banging for a year has been taking stress at every joint and fitting for a year. That’s how small issues become burst pipes. Treating noise as a signal, not just a nuisance, is what separates homeowners who catch problems early from the ones who come home to a flooded basement.
The good news is that most of what I’ve described here is genuinely within a capable homeowner’s reach. The goal isn’t fearless DIY overconfidence. It’s informed confidence paired with knowing exactly when to stop and make the call.
— Maayan
When it’s time to bring in the professionals
Some pipe problems respond perfectly to the DIY fixes covered here. Others need a trained eye and professional tools to diagnose and repair properly. Ag-plumbing has been serving Pittsburgh, PA homeowners for 30 years, and our team has seen every variation of noisy plumbing a residential system can produce.
If your noise persists after securing pipes and installing arrestors, if you’re seeing pressure fluctuations, or if you want a professional assessment before anything gets worse, our plumbing repair services include full noise diagnostics, water hammer arrestor installation, PRV replacement, and pipe support work. We also offer emergency plumbing assistance when things can’t wait. Scheduling an inspection is the fastest way to go from a noisy home to a quiet one, and to know for certain that your plumbing system is healthy underneath the walls.
FAQ
What causes pipes to make a banging noise?
Banging pipes are almost always caused by water hammer, which occurs when a valve closes quickly and sends a pressure shockwave through the plumbing. Common triggers include washing machines, dishwashers, and fast-closing faucet valves.
Can I fix water hammer myself?
Yes. Most homeowners can install a screw-on water hammer arrestor near the offending appliance without special tools. If the problem is house-wide, adjusting or replacing the pressure-reducing valve may also be necessary.
How do I stop pipes from rattling in the walls?
Rattling pipes are typically caused by loose mounting. Adding pipe clamps or cushioned straps at regular intervals, and placing foam insulation between the pipe and any framing it contacts, resolves the vibration in most cases.
What water pressure is safe for home pipes?
Keeping your home’s water pressure between 40 and 60 psi protects pipes from stress and reduces noise. Pressure above 80 psi accelerates wear at joints and contributes to persistent plumbing sounds.
When should I call a plumber for noisy pipes?
Call a professional if noise continues after securing pipes and installing arrestors, if you notice discolored water, visible corrosion, or reduced flow at multiple fixtures. These signs point to issues beyond standard DIY repair.
Recommended
- Common Plumbing Repair Issues and How to Fix Them – AG-Plumbing
- How to Identify When Plumbing Repair Is Necessary – AG-Plumbing
- Step-by-step pipe replacement guide for Pittsburgh homeowners – AG-Plumbing
- How to Fix a Running Toilet: a DIY Guide – AG-Plumbing