
TL;DR:
- Most common faucet problems can be fixed at home with proper tools and a clear process, avoiding unnecessary plumber calls. Regular cleaning and replacement of aerators are vital maintenance habits that prevent leaks, low flow, and pressure issues. If issues persist after DIY repairs, consulting a licensed plumber like AG-Plumbing ensures long-term solutions for complex or recurring problems.
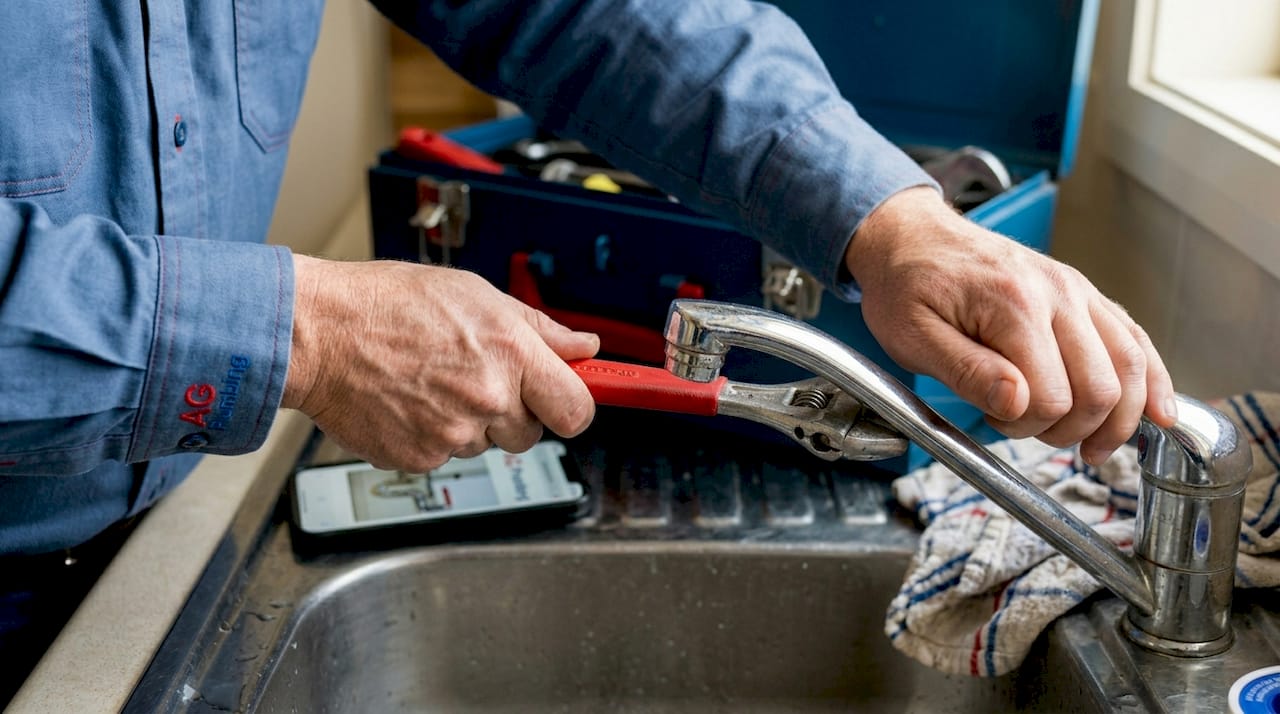
That dripping faucet in your kitchen or bathroom is more than just annoying. It’s wasting water and quietly adding to your utility bill every single day. Many Pittsburgh homeowners call a plumber for repairs that they could honestly handle themselves in under an hour. With the right tools, a clear process, and a bit of confidence, most common faucet problems are completely fixable without a service call. This guide walks you through everything: gathering supplies, diagnosing the problem, completing the repair, and keeping your faucet running smoothly long after the job is done.
Table of Contents
- Gather your tools and materials
- Diagnose the faucet problem
- Step-by-step faucet repair instructions
- Double-check your work and prevent future issues
- What Pittsburgh plumbers wish you knew about DIY faucet repair
- When to call a pro (and how AG-Plumbing can help)
- Frequently asked questions
Key Takeaways
| Point | Details |
|---|---|
| Start with symptom diagnosis | Identify the exact problem so you don’t waste time on unnecessary repairs. |
| Prepare tools in advance | Having the right tools and materials ready ensures a smoother DIY repair process. |
| Aerator care is crucial | Simple, routine cleaning of your aerator can prevent most faucet problems. |
| Follow each repair step | Stick to the process and use safety measures to ensure lasting results and avoid damage. |
| Know when to call a pro | If DIY doesn’t solve your problem, professional plumbing help is the safe, cost-effective choice. |
Gather your tools and materials
Before you start fixing your faucet, you’ll want to have all your supplies ready so you’re not scrambling mid-job. Nothing slows down a repair faster than having to stop and search for a tool while water drips down your cabinet. Getting organized up front saves you time and frustration.
Here are the tools and materials you’ll need for most common faucet repairs:
- Flathead and Phillips screwdrivers
- Adjustable wrench
- Needle-nose pliers
- Replacement cartridge (for a dripping faucet)
- Replacement or clean aerator (for low flow or spray issues)
- White vinegar (for mineral deposit removal)
- Small bowl or container to hold tiny parts
- Dry towel or cloth
Pro Tip: Place a folded towel in the sink basin before you start. Small screws and O-rings bounce and roll into drains faster than you’d think. A shallow bowl works great for holding parts in the order you removed them.
| Repair Type | Tools Needed | Materials Needed |
|---|---|---|
| Cartridge replacement | Screwdriver, adjustable wrench, pliers | Replacement cartridge, O-rings |
| Aerator cleaning | Pliers, small bowl | White vinegar, soft brush |
| Aerator replacement | Pliers | New aerator (sized to your faucet) |
| General disassembly | Screwdriver, wrench | Plumber’s grease, dry cloth |
Following a solid plumbing maintenance checklist before you start any repair helps you remember the steps and avoid missing small but important details. Many of the smart plumbing tips that experienced plumbers use come down to simple preparation habits exactly like this one.
The Pittsburgh Water & Sewer Authority (PWSA) recommends replacing aerators yearly and cleaning them twice per year, noting that most aerators unscrew by hand, though pliers may be needed. That’s a simple, low-cost habit that prevents most of the flow and pressure complaints we hear about from Pittsburgh homeowners.
Diagnose the faucet problem
Now that you’re organized, the next step is to understand what specifically is wrong with your faucet. Jumping into a repair without identifying the root cause is like taking medicine without knowing what’s wrong. A few minutes of careful observation will point you toward the right fix.
Common faucet symptoms and what they usually mean:
- Constant dripping from the spout: Worn cartridge, damaged O-ring, or a failing washer inside the valve
- Low water flow from both hot and cold: Clogged aerator, often from mineral buildup
- Uneven or sputtering spray pattern: Debris or calcium deposits blocked in the aerator mesh
- Leaking at the base of the handle: A damaged O-ring or loose packing nut
- Water pooling under the sink: Loose supply line connections or a cracked valve body
A dripping faucet wastes far more water than most people realize. Even a slow drip can waste over 3,000 gallons of water per year, which adds real money to your water bill. That’s enough water to fill a small above-ground pool. If you want to fix dripping faucets quickly, the earlier you act, the better for your wallet.
Before assuming a part is worn out, check the aerator first. According to the PWSA, clogged or dirty aerators can restrict water flow or cause unusual spray patterns. This is one of the most common faucet complaints we see, and it costs nothing but a little time to fix. Exploring cost-saving plumbing tips early in your homeowner journey helps you understand which problems are simple fixes versus situations that need a licensed pro.
Pro Tip: Run the faucet for 30 seconds and pay close attention to the spray pattern, temperature response, and whether dripping continues after you shut it off. Those clues tell you exactly where to focus your repair effort.
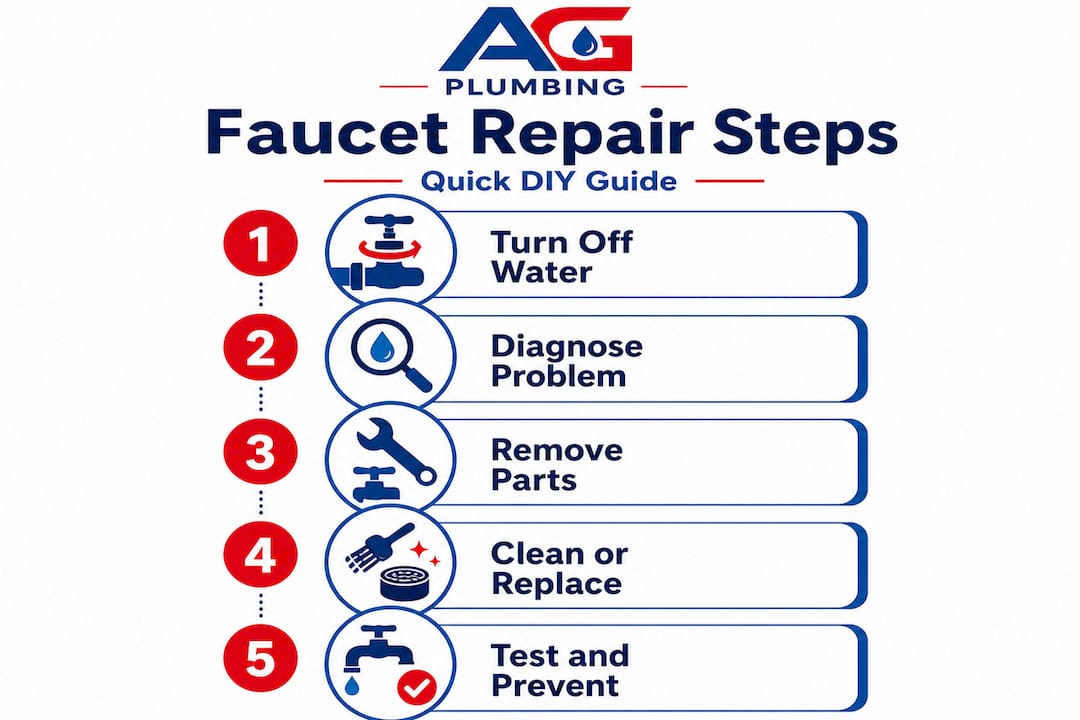
Step-by-step faucet repair instructions
With the issue identified, you’re ready to roll up your sleeves and get hands-on with your faucet repair. The two most common repairs Pittsburgh homeowners need are cartridge replacement and aerator cleaning or replacement. Here’s a clear walkthrough for both.
Safety first: Always shut off the water supply valves under your sink before disassembling any part of your faucet. Turn both the hot and cold valves clockwise until they stop. Then turn on the faucet to release any pressure in the line before you begin.
Cartridge replacement (for dripping faucets)
- Turn off the supply valves under the sink and open the faucet to relieve pressure.
- Remove the decorative cap on top of the handle (usually a small plastic plug you can pop off with a flathead screwdriver).
- Unscrew the handle screw underneath that cap and pull the handle straight up to remove it.
- Locate the packing nut or retaining clip that holds the cartridge in place and remove it carefully.
- Pull the cartridge straight up and out. Note its orientation before you remove it.
- Take the old cartridge to a hardware store to match the exact replacement, or use your faucet’s model number.
- Insert the new cartridge in the same orientation as the old one.
- Reassemble in reverse order: retaining nut or clip, handle, screw, and decorative cap.
- Turn the supply valves back on slowly and test both hot and cold.
Aerator cleaning or replacement (for low flow and spray issues)
- Wrap the faucet tip with a cloth or tape to protect the finish, then unscrew the aerator counterclockwise using pliers.
- Disassemble the aerator parts in order (screen, washer, flow restrictor) and lay them out on a towel.
- Soak all parts in white vinegar for 15 to 30 minutes to dissolve mineral buildup.
- Scrub with an old toothbrush, rinse thoroughly, and reassemble in the correct order.
- If the screen is damaged or parts crumble, replace the entire aerator unit.
- Screw the aerator back on firmly but do not overtighten, which can crack the housing.
- Run the water and check for even flow and a clean spray pattern.
| Step | Cartridge Repair | Aerator Repair |
|---|---|---|
| Turn off water | Yes, supply valves under sink | Yes, or turn off at faucet handle |
| Main part removed | Cartridge from valve body | Aerator from faucet tip |
| Core fix | Replace cartridge | Clean or replace aerator |
| Key caution | Match cartridge orientation | Don’t overtighten on reassembly |
| Test after repair | Run hot and cold, check for drip | Check spray pattern and flow rate |
A helpful Home Depot faucet repair walkthrough shows removing the packing nut and cartridge, replacing the cartridge, reassembling carefully, and checking the aerator after the job is done. It also emphasizes avoiding overtightening, which is one of the most common mistakes homeowners make when putting everything back together.
Pro Tip: Before you remove the cartridge, use your phone to take a photo of it in place. That picture is a lifesaver when you’re trying to reassemble and can’t remember which way it was facing.
For more complex situations, reviewing common plumbing repairs that Pittsburgh homeowners regularly encounter gives you a broader picture of what to expect. If you’re also dealing with an aging fixture, knowing how to install plumbing fixtures correctly can save you from repeating the same repair a year from now.
Double-check your work and prevent future issues
Once the faucet is reassembled, you’re almost done. Just a few checks to make sure the fix sticks and that you haven’t introduced any new problems in the process. This final stage takes only a few minutes and can save you a second repair call down the road.
Steps to verify your repair was successful:
- Turn on cold water first, watch for dripping from the spout, and confirm steady even flow.
- Switch to hot water and repeat the same check for dripping and flow.
- Inspect the aerator spray pattern from directly below to confirm even, full coverage with no sputtering.
- Look under the sink at the supply valves and connections for any sign of new drips or moisture.
- Run the faucet for a full 60 seconds and watch the base of the handle for leaks, which can appear slowly after pressure builds.
If the faucet still drips after cartridge replacement, double-check that the cartridge is seated fully and facing the right direction. A cartridge installed backward or even slightly off-center will not seal properly. If flow is still low after aerator cleaning, the restrictor or screen may need full replacement rather than just a soak.
The PWSA recommends cleaning aerators twice yearly and replacing them about once per year. In Pittsburgh, water mineral content can build up in your aerator faster than you’d expect, especially during summer months when usage spikes. Building this into your regular home maintenance routine keeps your faucets performing at their best all year long.
Pro Tip: Set a reminder on your phone for every six months to do a quick aerator soak in vinegar. It takes about 20 minutes and prevents the slow buildup that eventually causes low flow and weird spray patterns.
For a broader look at what you can do to protect your plumbing system long-term, the preventative plumbing tips we recommend cover the full picture from faucets to pipes. If you want cleaner water flowing through your entire home, learning how to clean water lines is a smart next step worth exploring.
What Pittsburgh plumbers wish you knew about DIY faucet repair
With your repair complete, let’s look at this process from a pro’s perspective so you know what really matters in the long run. After 30 years of working on Pittsburgh homes, we’ve seen patterns that most DIY guides never talk about.
The number one thing we wish more homeowners understood is this: most “mystery” faucet problems are aerator problems. Homeowners replace cartridges, call plumbers, and spend money on new faucets when the real culprit is a $3 aerator clogged with mineral deposits. Pittsburgh water, while safe and treated, carries dissolved minerals that accumulate over months. That’s just the reality of the local water supply. Regular aerator cleaning is genuinely the single highest-return maintenance task in your kitchen or bathroom.
We also see homeowners push too hard on corroded parts. If a nut won’t turn, forcing it with a longer wrench handle is almost never the answer. Stripped threads or cracked valve bodies turn a 30-minute DIY fix into a full faucet replacement. If something feels unusually stuck or corroded, that’s a reasonable stopping point to call a professional. Knowing when to stop is actually a sign of good judgment, not failure.
DIY faucet repair is genuinely empowering and worthwhile for the repairs covered in this guide. But deeper leaks, persistent water pooling under the cabinet, or problems that return within weeks of repair usually point to something beyond the cartridge or aerator. That’s where smart plumbing insights from experienced professionals add real value. Pittsburgh homes, especially older ones in neighborhoods like Shadyside or Lawrenceville, can have aging supply lines and valve bodies that need a trained eye. Empowerment comes from knowledge, and knowing the line between “I’ve got this” and “I need backup” is the mark of a smart homeowner.
When to call a pro (and how AG-Plumbing can help)
Some faucet problems simply require more expertise. Here’s when Pittsburgh’s trusted AG-Plumbing team is your smartest option.
If you’ve cleaned the aerator, replaced the cartridge, and the problem keeps coming back, something deeper is going on. Persistent leaks under the sink, water pressure that drops across multiple fixtures, or rust in your water are all signs that the issue goes beyond a simple faucet repair. These situations call for a licensed plumber who can trace the source rather than patch the symptom.

AG Heating, Cooling & Plumbing has served Pittsburgh homeowners for 30 years with honest, skilled professional plumbing repair you can count on. We handle everything from cartridge swaps to full fixture replacements and complex pipe work. If you want to understand the full range of what can go wrong and what to do about it, our guide on common plumbing issues is a great starting point. And for a complete picture of what professional plumbers can do to keep your home running right, explore all essential plumbing services we offer to Pittsburgh homeowners.
Frequently asked questions
How often should I clean my faucet aerator in Pittsburgh?
The PWSA recommends cleaning your aerator about twice per year and replacing it fully about once per year to maintain strong, even water flow.
Is it safe to repair a dripping faucet myself?
Yes, most dripping faucet repairs are completely safe for DIY as long as you shut off your water supply valves first and follow the steps carefully. The Home Depot faucet repair guide shows the full process, including avoiding overtightening during reassembly.
What if my faucet leaks under the sink after repair?
Check that all supply line connections are hand-tight, that washers are seated properly, and that no connections were disturbed during your repair. If the leak continues after tightening, contact a licensed plumber to avoid water damage to your cabinet.
Do all faucet repairs need replacement parts?
Not always. Sometimes cleaning the aerator is the only fix needed. The PWSA explains that aerators can be cleaned by removing them, soaking in white vinegar, scrubbing, rinsing, and reassembling without buying anything new.
How do I prevent my faucet from dripping again?
Clean your aerator every six months and replace it annually, as the PWSA recommends, and address any new drip promptly before it wears down the cartridge or washer further.
Recommended
- Install plumbing fixtures: Pittsburgh homeowner guide – AG-Plumbing
- Examples of plumbing repairs Pittsburgh homeowners need – AG-Plumbing
- Cost-saving plumbing tips for Pittsburgh homeowners – AG-Plumbing
- Smart Plumbing Tips Every Pittsburgh Homeowner Needs – AG-Plumbing