TL;DR:
- A proper toilet installation involves careful removal of the old fixture and precise fitting of the new one to prevent leaks and damage.
- Key steps include gathering the right tools, ensuring the flange is level, and applying consistent pressure when tightening bolts.
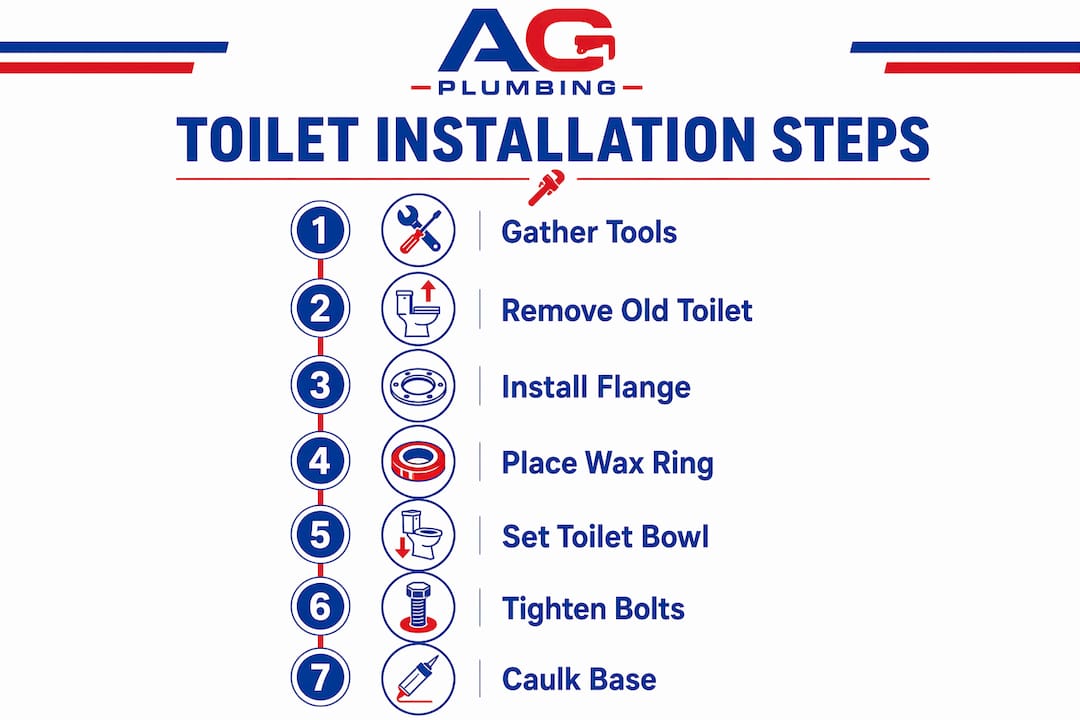
A toilet installation guide is a step-by-step process for removing an old toilet and fitting a new one securely to prevent leaks, sewer gas exposure, and structural damage to your bathroom floor. Done correctly, the result is a stable, watertight fixture that functions reliably for years. Done wrong, even a small misalignment can cause slow leaks that rot subfloor material and cost far more to fix than the original job. This guide covers every phase of a DIY toilet install, from gathering tools to caulking the base, using current best practices from KOHLER, Ace Hardware, and McCoy’s Building Supply.
What tools and materials do you need for a toilet installation?
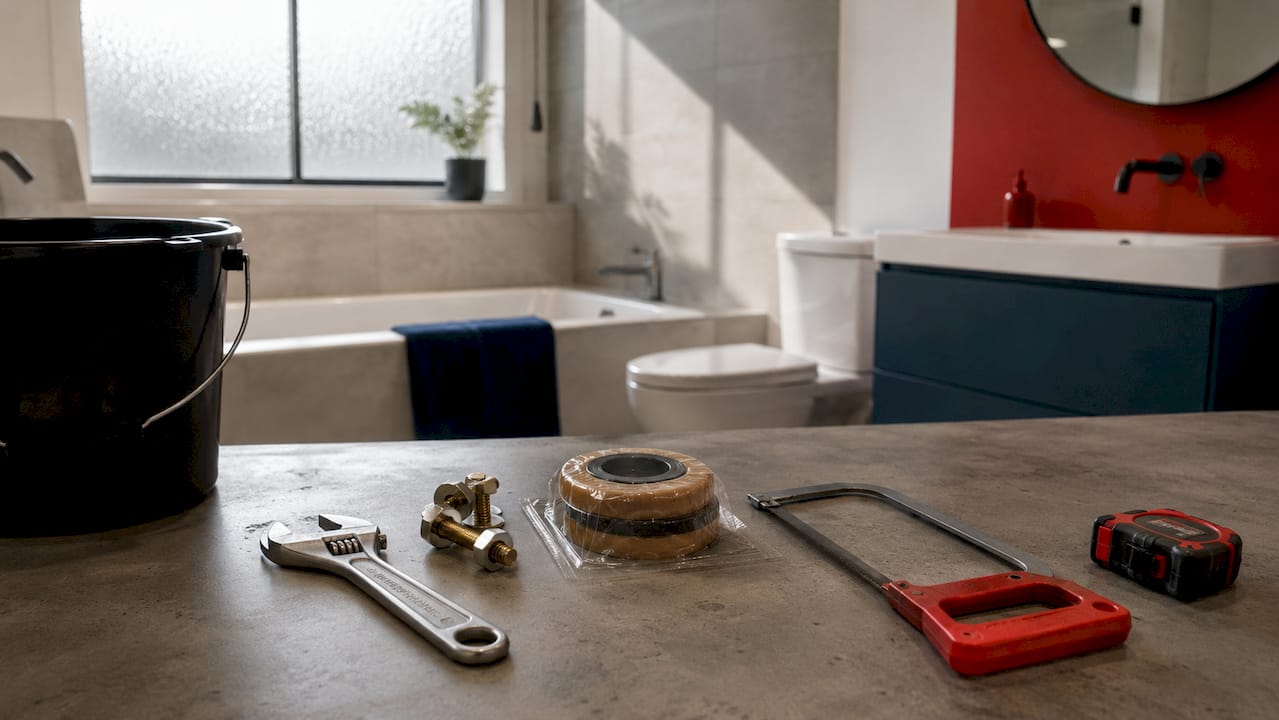
Preparation is the single biggest factor separating a clean install from a frustrating one. KOHLER’s installation guide lists the core items as an adjustable wrench, putty knife, bucket, towels, a new wax ring, mounting bolts, and silicone caulk. Gathering everything before you start means you never leave the bathroom mid-job with an open flange.
Here is a complete checklist of what you need:
- Adjustable wrench for supply line nuts and tank bolts
- Putty knife to scrape old wax ring residue from the flange
- Bucket and old towels to catch water from the tank and bowl
- Sponge or wet/dry vacuum to remove the last inch of water
- New wax ring (standard or with horn extension, depending on flange height)
- Closet bolts (also called johnny bolts) to anchor the bowl to the flange
- Silicone caulk rated 100% silicone for the base seal
- Level to check the bowl sits flat
- Hacksaw to trim bolt length after tightening
Model-specific parts matter. Always read the manufacturer’s instructions for your toilet before buying parts. A KOHLER Cimarron, for example, has different tank-to-bowl hardware than a Toto Drake. Buying generic bolts for a model that requires specific hardware is a common and avoidable mistake.
Pro Tip: Lay a tarp or old cardboard on the bathroom floor before you start. It protects tile from dropped tools and gives you a clean surface to set the tank and bowl during the swap.
How do you remove an old toilet properly?
Safe removal sets up a clean installation. Rushing this phase leaves water on the floor, exposes you to sewer gas risks, and can damage the flange you need for the new toilet.
Follow these steps in order:
- Turn off the water supply. Close the shutoff valve on the wall behind the toilet. Turn it clockwise until it stops.
- Flush the toilet. Hold the handle down to empty as much water from the tank as possible.
- Remove remaining water. Use a sponge or wet/dry vacuum to pull the last water from both the tank and the bowl. Leftover water spills when you lift the toilet.
- Disconnect the supply line. Unscrew the braided line from the bottom of the tank. Have a towel ready for drips.
- Remove the tank (two-piece toilets). Unscrew the two or three tank bolts from inside the tank. Lift the tank straight up and set it aside.
- Remove the caps and nuts from the closet bolts. Pop off the plastic caps at the base, then unscrew the nuts with your adjustable wrench.
- Lift the bowl. Rock it gently side to side to break the wax seal, then lift straight up. Set it on the tarp.
- Block the flange opening. Stuff a rag firmly into the drain opening. This blocks sewer gas entry while you work.
Pro Tip: Wear rubber gloves throughout removal. The old wax ring is messy, and the water left in the bowl is not clean.
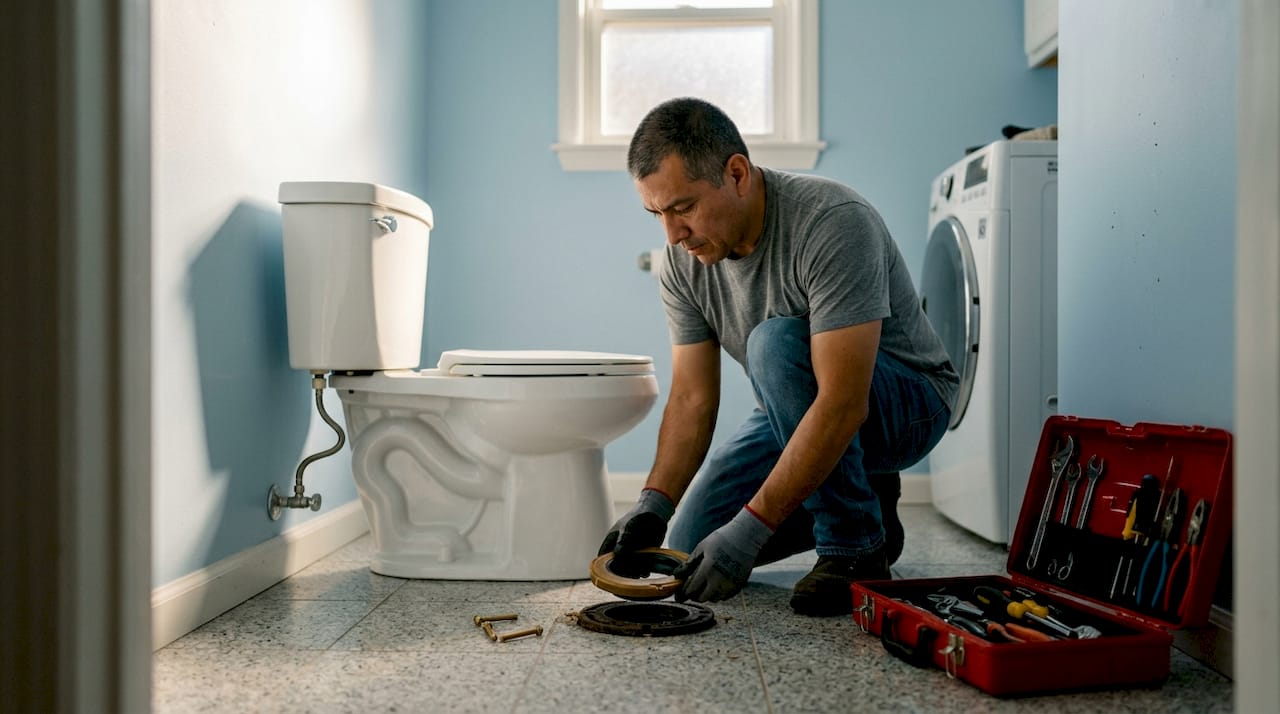
How to install the flange, wax ring, and bowl for a secure fit
This phase is where most DIY toilet installs succeed or fail. The flange, wax ring, and bowl must align perfectly before you apply any weight.
Follow these steps carefully:
- Scrape the old wax ring. Use your putty knife to remove all residue from the flange surface. A dirty flange prevents a proper seal.
- Inspect the flange. A level flange sitting at or slightly above the finished floor is required for a stable, leak-free install. A cracked or sunken flange needs repair before you go further.
- Insert the closet bolts. Slide the new bolts into the flange slots. Position them parallel to the back wall so the bowl holes line up correctly.
- Warm the wax ring. Let it sit at room temperature for at least 30 minutes before use. Cold wax rings are brittle and fail to form a proper seal. This is one of the most overlooked steps in a DIY toilet install.
- Dry fit the bowl first. Lower the bowl over the bolts without the wax ring to check alignment and confirm it does not rock. A dry fit check before compressing the wax ring prevents you from having to restart the whole process.
- Place the wax ring. Press it onto the bottom of the bowl outlet (horn side down) or set it on the flange (wax side up). Either method works; follow your manufacturer’s instructions.
- Lower the bowl straight down. Line up the bolt holes with the closet bolts and lower the bowl in one controlled motion. Do not shift the bowl once it contacts the wax. Any lateral movement breaks the seal.
- Compress the wax ring. Sit on the toilet and press down firmly with your full body weight. This compresses the wax into a watertight seal.
- Tighten the closet bolts. Hand-tighten the nuts first, then snug them with a wrench. Alternate sides to apply even pressure.
Overtightening closet bolts is a serious mistake. Cracked porcelain from over-torqued bolts is not covered by most warranties and requires a full toilet replacement. Snug is enough.
Flange height reference
| Flange condition | Recommended action |
|---|---|
| Level with or slightly above floor | Install directly, no spacer needed |
| Below finished floor level | Add a flange extender ring |
| Cracked or broken | Replace flange before proceeding |
| Corroded cast iron | Consult a licensed plumber |
Pro Tip: After tightening the closet bolts, use a hacksaw to trim the excess bolt length above the nut. This lets the plastic caps snap on flush and gives the base a finished look.
What are the steps to reconnect the tank, water supply, and finish the install?
With the bowl set and secured, the remaining steps focus on the tank, water supply, and final sealing. Work methodically and check for leaks at each connection before moving on.
- Attach the tank to the bowl. Place the rubber tank gasket over the flush valve opening at the bottom of the tank. Lower the tank onto the bowl and align the bolt holes.
- Insert and tighten tank bolts. Thread the bolts through the tank and bowl holes. Add a rubber washer and metal washer, then hand-tighten the nuts from below. Alternate sides to keep the tank level.
- Reconnect the water supply line. Thread the supply line nut onto the fill valve at the bottom of the tank. Hand-tighten, then give it a quarter turn with a wrench. Do not overtighten.
- Turn on the water supply. Open the shutoff valve slowly. Watch the supply line connection for drips as the tank fills.
- Test flush. Flush once and watch for leaks at three points: the supply line connection, the tank bolt area, and the base of the bowl.
- Caulk the base. Apply a bead of 100% silicone caulk around the entire base of the toilet where it meets the floor. The International Plumbing Code requires this seal to prevent water from getting under the toilet and damaging the subfloor.
A few things to watch for after the first flush:
- Water dripping from tank bolts means the rubber washers are not seated correctly. Tighten slightly and recheck.
- A rocking toilet after installation means the bowl is not fully compressed onto the wax ring or the floor is uneven. Add plastic toilet shims under the base before caulking.
- A slow drip at the supply line connection usually means the nut needs one more quarter turn.
What are common toilet installation mistakes and how can you avoid them?
Even careful homeowners make these errors. Knowing them in advance saves you from redoing the job.
- Shifting the bowl after wax contact. Once the bowl touches the wax ring, any sideways movement tears the seal. Lower it once, straight down, and do not adjust.
- Skipping the dry fit. Setting the bowl without a test run first means you may discover alignment problems only after the wax is compressed and ruined.
- Using a cold wax ring. Cold wax rings do not compress evenly. Always bring the ring to room temperature before installation.
- Forgetting to block the flange. An open flange fills the bathroom with hydrogen sulfide gas. Always stuff a rag in the opening during removal and installation.
- Overtightening bolts. Porcelain cracks under too much torque. Tighten to snug, not tight.
- Skipping the caulk. Leaving the base unsealed allows floor water to seep under the toilet and cause mold, rot, and odor over time.
Pro Tip: Patience is the most underrated part of a DIY toilet install. Rushing any single step, especially the wax ring placement, is the fastest way to create a leak you will not notice for weeks.
Key Takeaways
A successful toilet installation depends on thorough preparation, correct wax ring placement, and careful tightening at every connection point.
| Point | Details |
|---|---|
| Gather all tools first | Collect wrench, wax ring, bolts, caulk, and towels before shutting off water. |
| Warm the wax ring | Let the wax ring reach room temperature to form a proper, flexible seal. |
| Dry fit before sealing | Lower the bowl without the wax ring first to confirm alignment and check for rocking. |
| Never shift after contact | Once the bowl touches the wax ring, press straight down and do not move it sideways. |
| Caulk the base last | Apply 100% silicone caulk around the base after confirming there are no leaks. |
What I’ve learned from watching homeowners rush this job
The most common call Ag-plumbing receives after a DIY toilet install is not about a broken part. It is about a slow leak that went unnoticed for two or three weeks. By the time the homeowner calls, the subfloor is soft and the repair cost has tripled.
The wax ring is where most of those leaks start. Homeowners set the bowl, feel it land, and assume the seal is good. What they miss is that the bowl shifted half an inch during lowering, or the wax was too cold to compress fully. Neither problem is visible from the outside. The toilet flushes fine. The floor looks dry. Then one day the tile grout starts to darken, and the smell arrives.
The dry fit step is the one I push hardest. Lower the bowl without the wax ring, sit on it, check that it does not rock, and confirm the bolt holes line up cleanly. That two-minute check eliminates the most expensive mistakes. McCoy’s Building Supply makes this point clearly in their installation guide, and I agree completely.
The other thing I tell homeowners: read the manufacturer’s instructions for your specific toilet model before you buy a single part. A toilet rough-in measurement that does not match your bathroom layout means the toilet physically will not fit, regardless of how well you follow a generic guide. Measure first. Buy second. Install third.
— Maayan
When professional plumbing help makes more sense
Some toilet installations reveal bigger problems underneath. A cracked flange, a rotted subfloor, or a drain line that is not at the right height are not DIY fixes.
Ag-plumbing has served Pittsburgh, PA homeowners for 30 years. The team handles everything from straightforward toilet swaps to full plumbing fixture installations where the rough-in needs adjustment or the existing drain work does not meet current code. If you pull the old toilet and find a damaged flange, corroded pipe, or a floor that flexes underfoot, stop the job and call a licensed plumber. Pushing forward on a compromised base creates water damage that costs far more than a service call. Visit Ag-plumbing’s Pittsburgh services to schedule an assessment or get a quote on professional installation.
FAQ
What is a wax ring and why does it matter?
A wax ring is a soft wax gasket that seals the toilet bowl outlet to the drain flange, preventing leaks and sewer gas from escaping. Without a properly compressed wax ring, every flush risks pushing water and gas into the subfloor.
How long does a DIY toilet install take?
A straightforward toilet replacement takes most homeowners 1–3 hours, including removal of the old unit and full installation of the new one. Complex issues like a damaged flange or uneven floor add significant time.
Can I reuse the old wax ring?
No. Wax rings are single-use components. Once compressed, the wax cannot re-form a proper seal. Always install a new wax ring when replacing or reinstalling a toilet.
How do I know if my toilet is leaking at the base?
Water pooling around the base after flushing, soft flooring near the toilet, or a persistent sewer odor are the main signs of a base leak. A leaking toilet base often means the wax ring seal has failed and the toilet needs to be reset.
Do I need to caulk around the toilet base?
Yes. The International Plumbing Code requires silicone caulk at the base to prevent water from seeping under the toilet and damaging the subfloor. Use 100% silicone, not latex caulk.
Recommended
- What Is Toilet Rough-In? A Homeowner’s Guide – AG-Plumbing
- Clear Sewer Line Blockages: 2026 Homeowner’s Guide – AG-Plumbing
- Sanitary drainage explained: A homeowner’s guide to reliability – AG-Plumbing
- Install plumbing fixtures: Pittsburgh homeowner guide – AG-Plumbing